How to Use Lens Filters in Photography
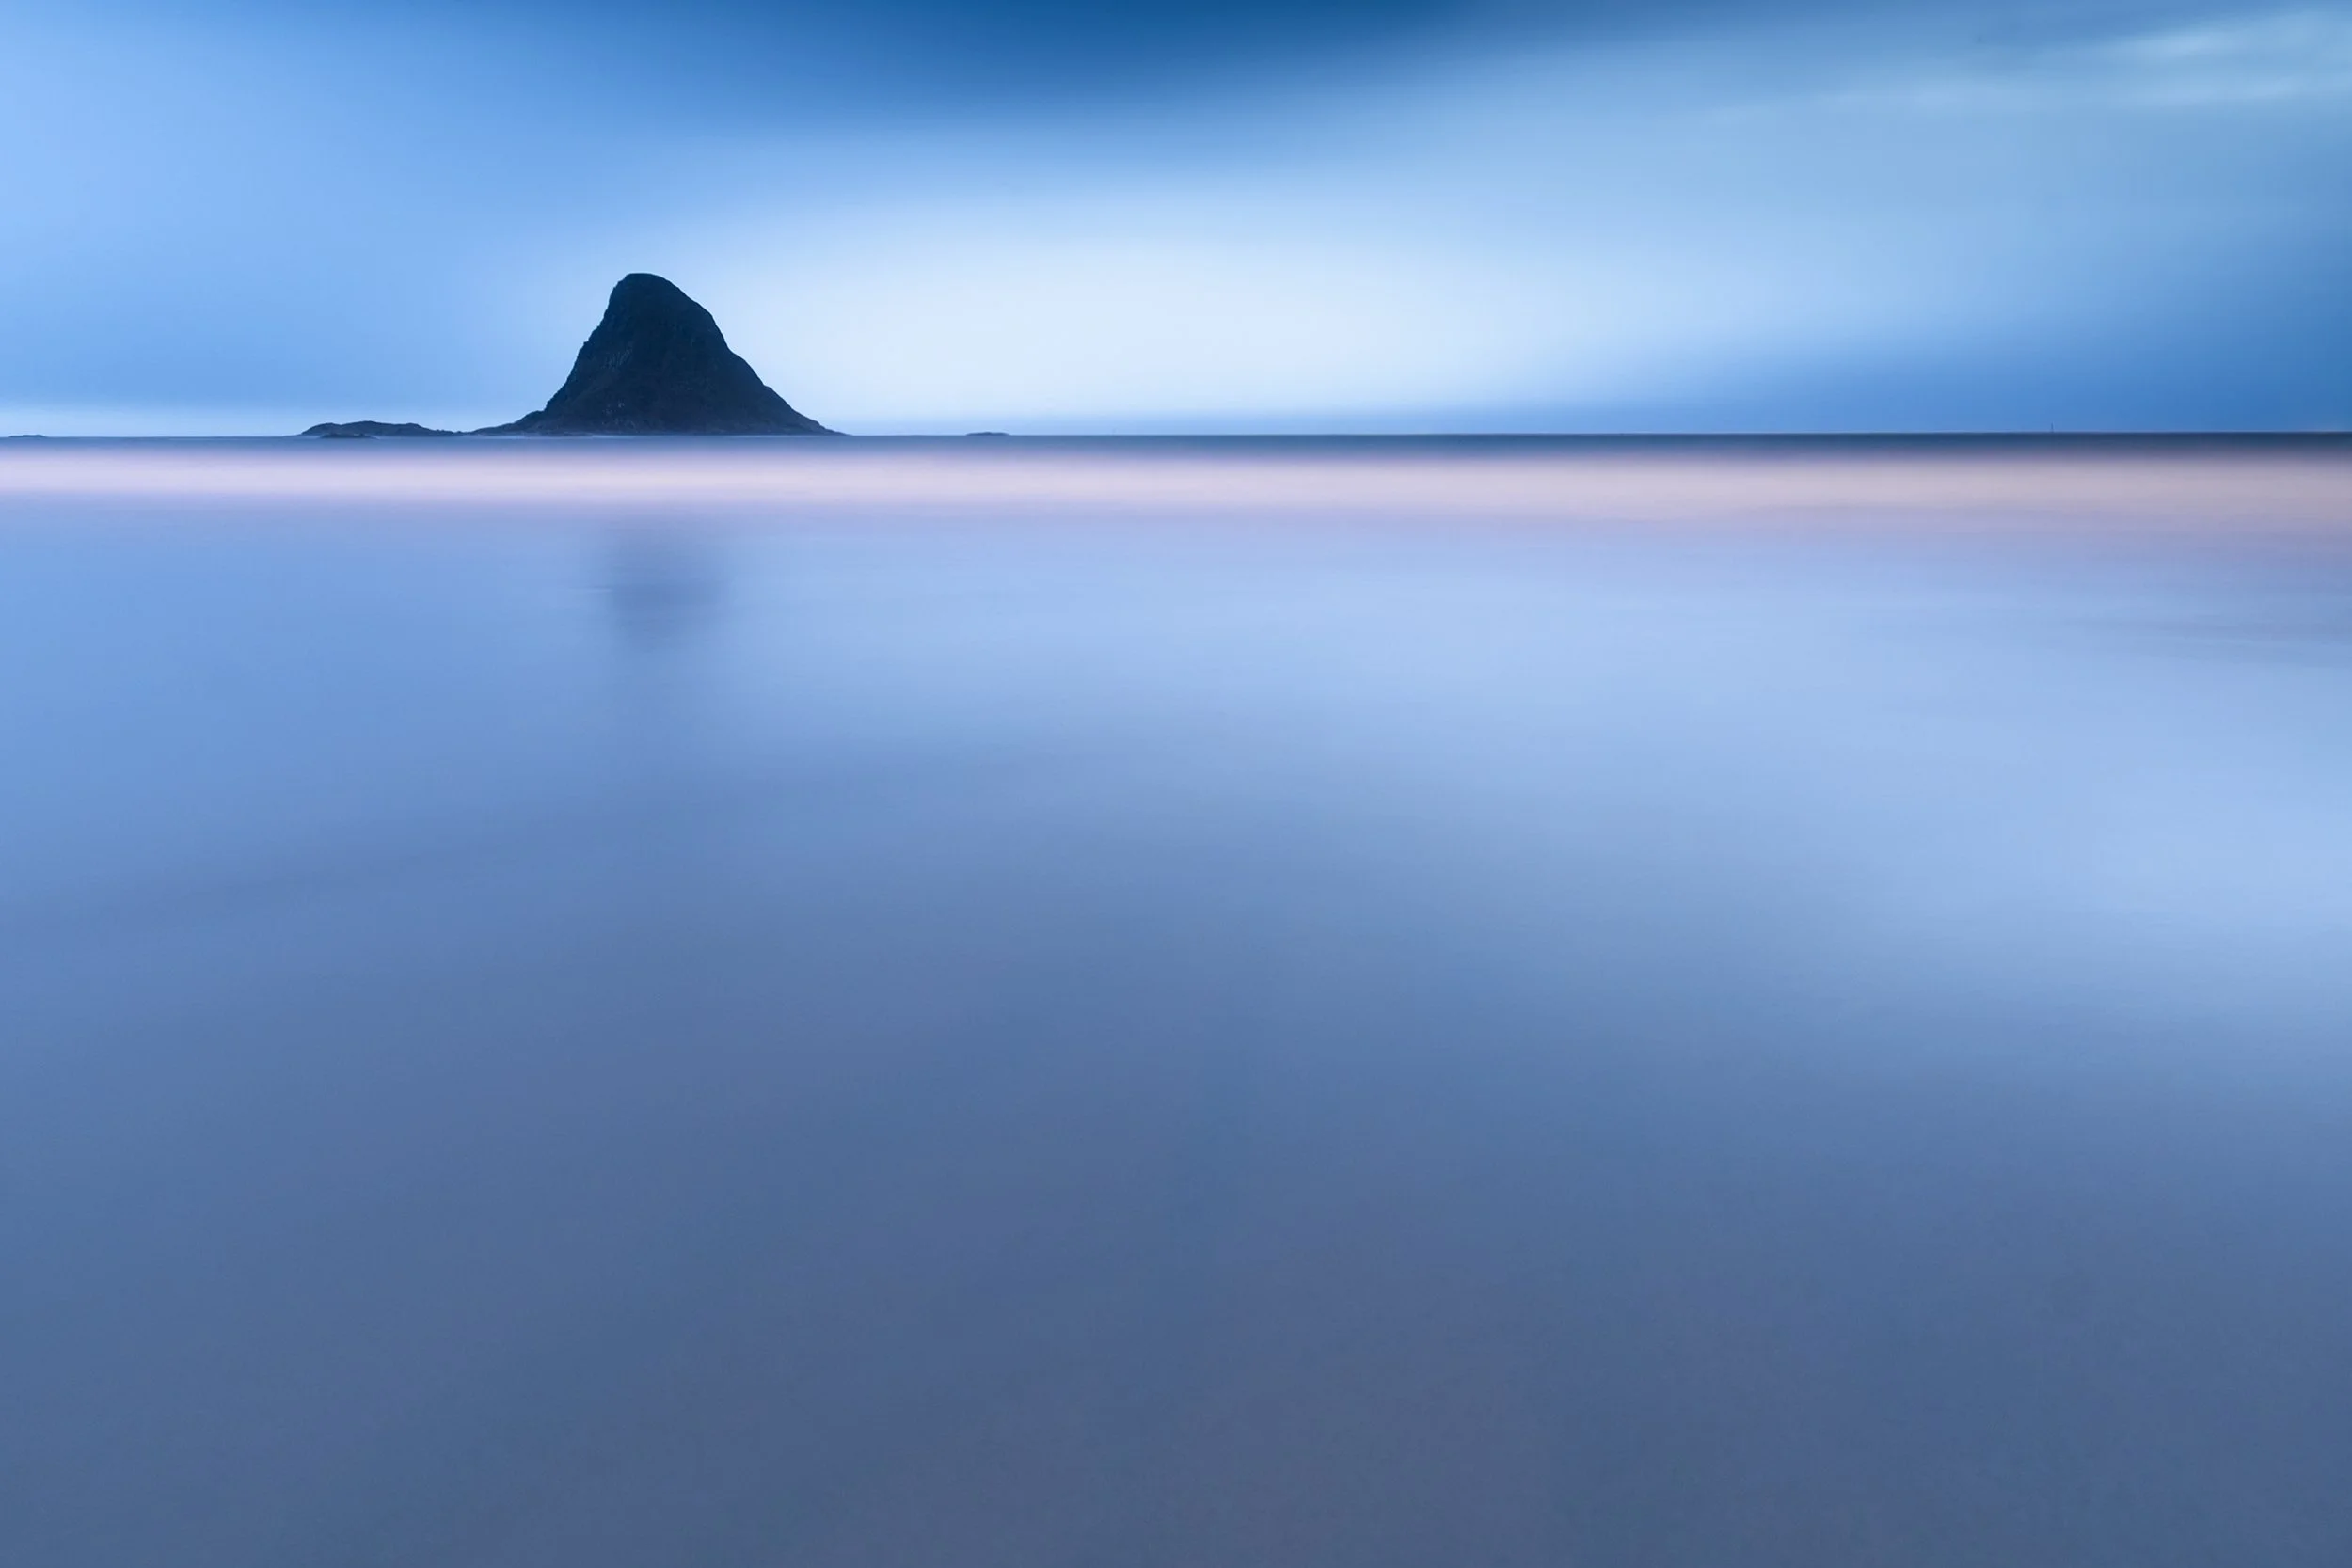
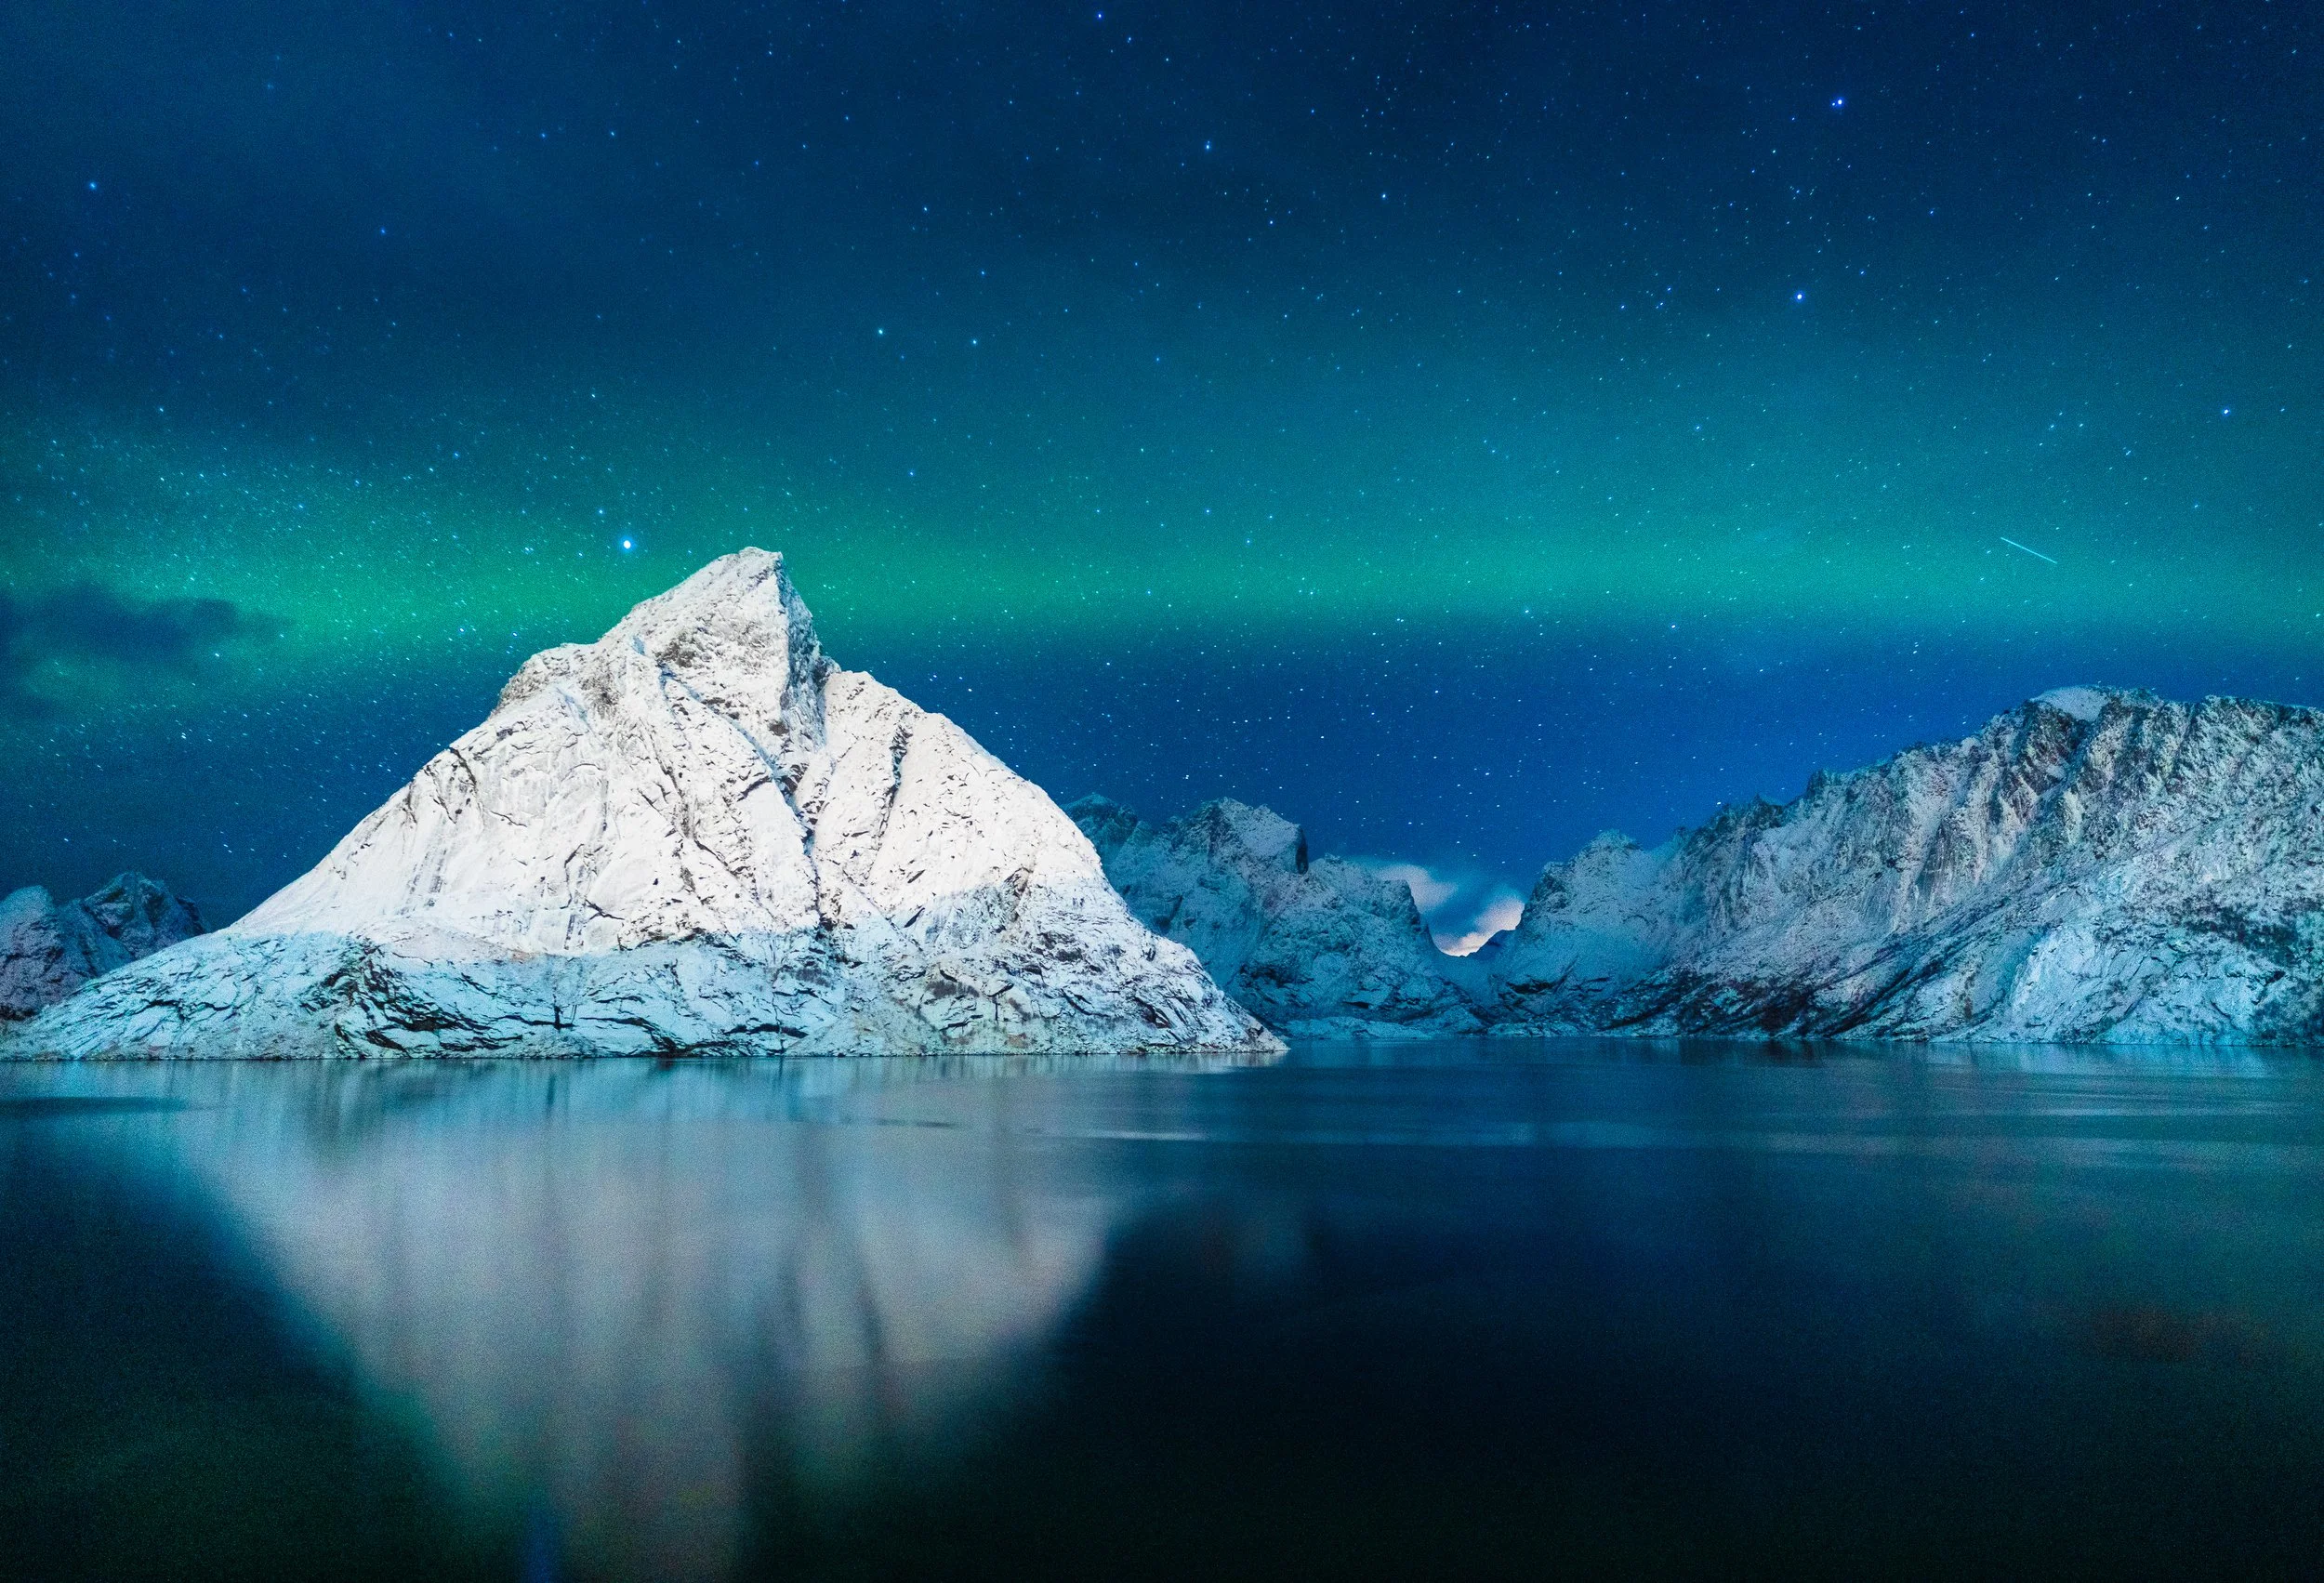
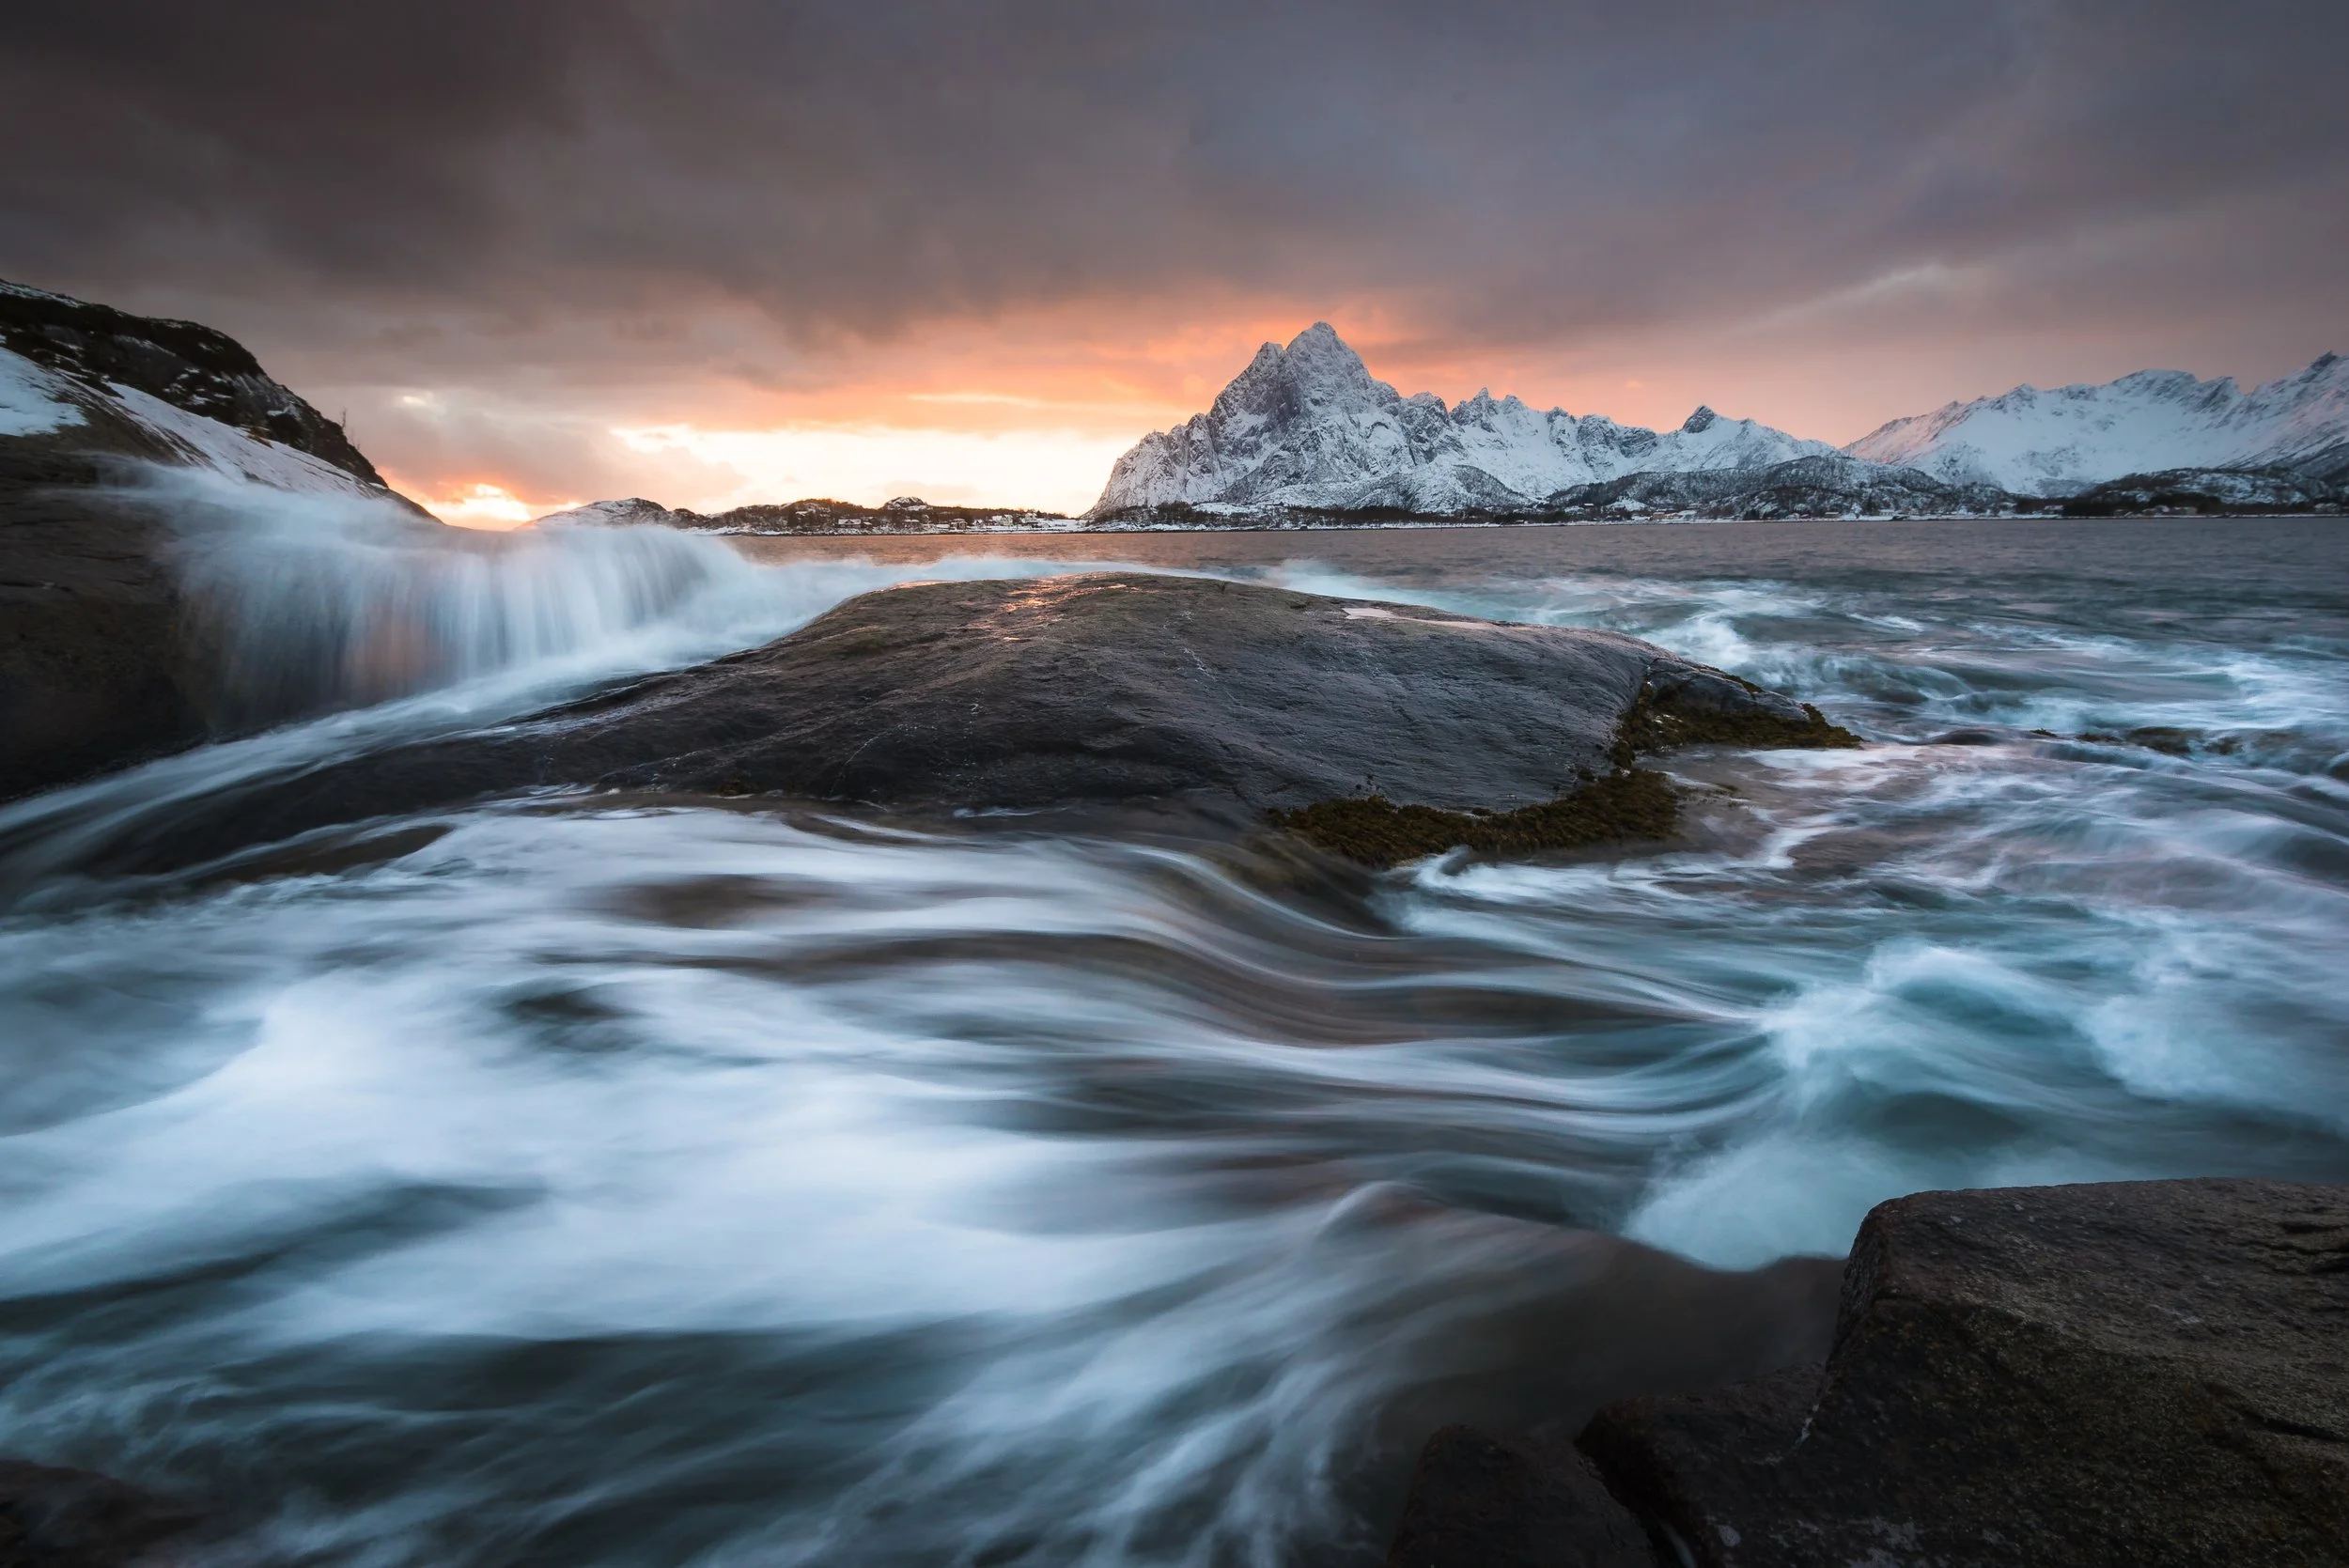
Vesterålen, Norway. Filters used: ND1000 (10-stop) and graduated ND 0.9 (3 stops). Exposure time: 180 seconds.
Expanding your creative vision
Lens filters remain one of the most precise tools for controlling light at the moment of exposure. In a digital age where much can be adjusted later in editing, they still offer something unique: the ability to control shutter speeds, tonal balance, and reflection before the image is ever captured.
Bjørn Joachimsen (text and photos)
Despite the significant advancements in digital post-processing tools and camera technology, lens filters mounted on the front of the lens continue to offer photographers a distinct set of possibilities. In many situations, they provide a level of control that cannot be fully replicated after the fact—particularly when it comes to managing reflections and rendering time through long exposures. When used in combination with thoughtful post-processing, they form a coherent and highly effective workflow from capture to final image.
Why Lens Filters still Matter
There is a moment in photography where observation transitions into interpretation. It is subtle, but decisive. Lens filters belong to that moment.
They do not impose an effect onto an image; rather, they influence how the scene is translated into a photograph. By controlling light before it reaches the sensor, they allow decisions to be made at the point of capture—where the relationship between time, structure, and tone is still fluid.
With filters mounted on the lens, the process becomes less reactive and more intentional. Water can be rendered as movement or as stillness, reflections can be emphasised or suppressed, and tonal balance can be stabilised without compromise.
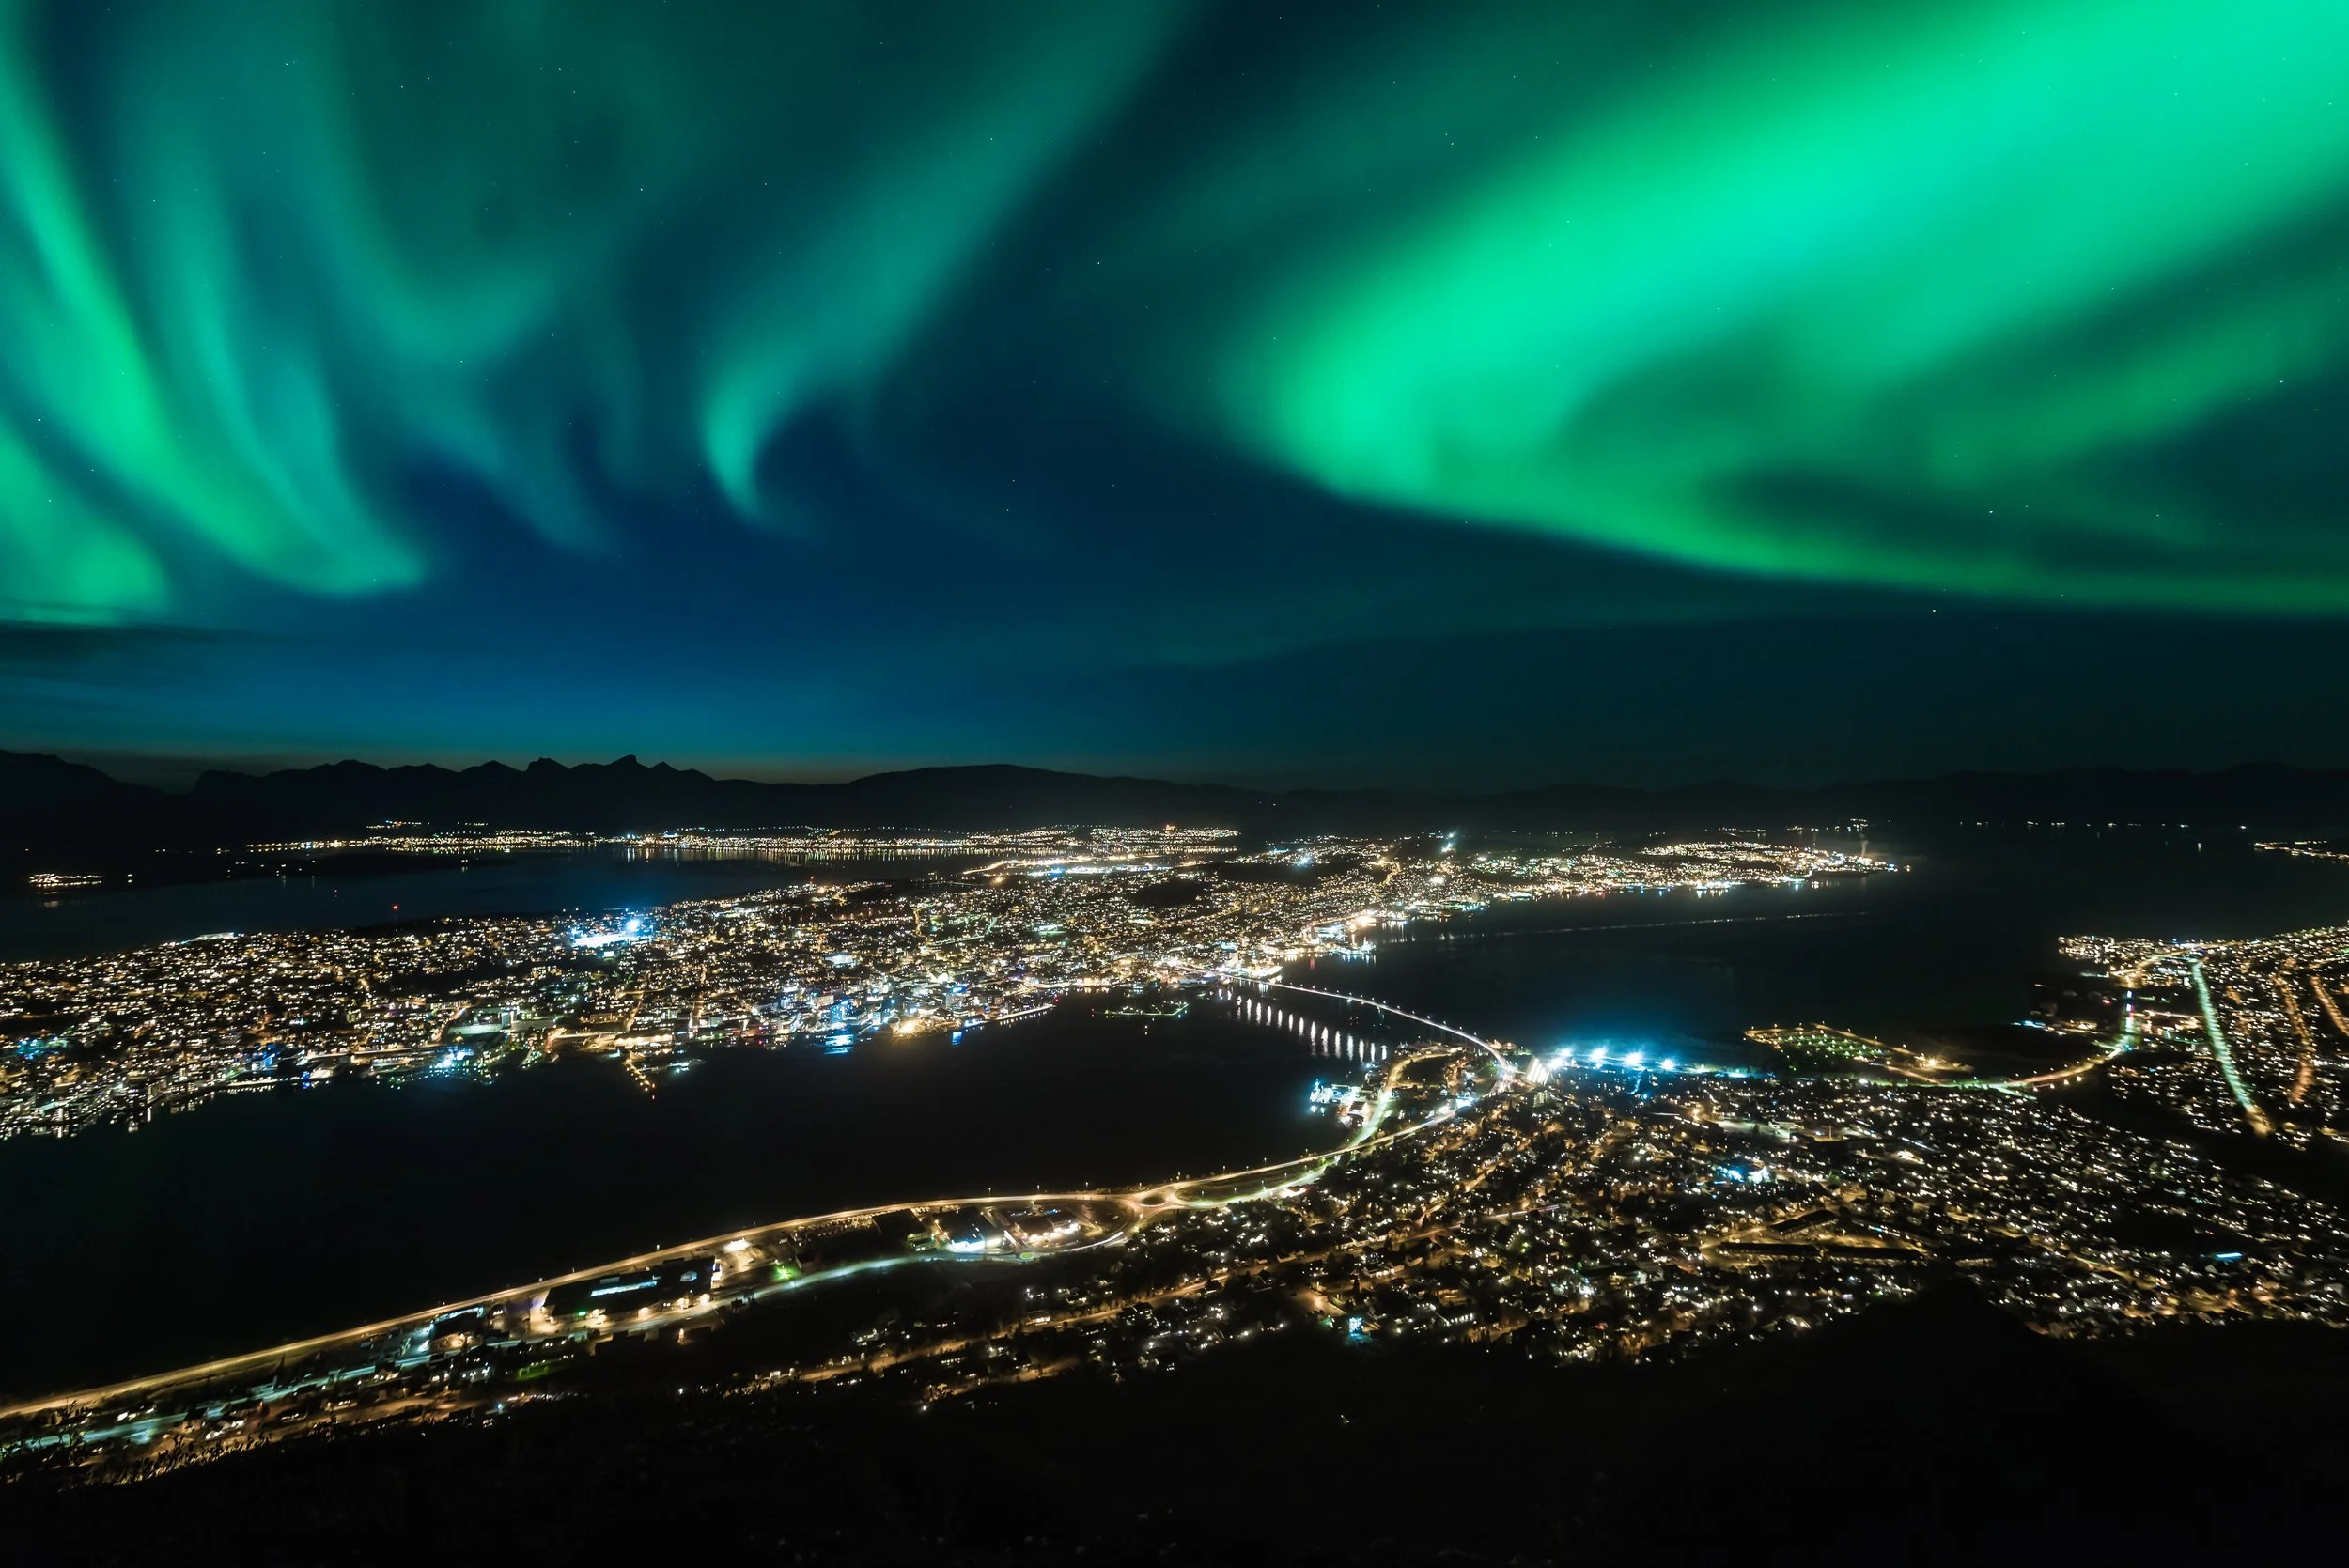
Aurora Borealis over Tromsø, Norway. The intensity of the city lights became visually dominant, so a graduated GND8 (0.9) filter with a soft transition was used to reduce their impact. By positioning the darker portion of the filter at the bottom of the frame, the luminance of the foreground was brought into balance, allowing the aurora to be rendered with a more appropriate and harmonious exposure.
What Lens Filters Actually Do
Lens filters offer the ability to transform a scene in accordance with your creative intent, shaping the final image into something more engaging and expressive than a mere recording of what was present in front of the camera at the moment of exposure. Rather than acting as creative shortcuts, they function as instruments of precision, allowing the photographer to establish a controlled and deliberate foundation at the point of capture—one that carries through as a stronger and more coherent basis for subsequent post-processing.
Types of Filters and Their Purpose
Although lens filters are often discussed one by one , they are better understood as a system. Each addresses a specific aspect of light, and together they give the photographer more control over how a scene is rendered
Polarising Filters (CPL)
Polarising filters give you control over reflections from non-metallic surfaces such as water, glass, wet rocks, and leaves. By rotating the filter, reflections can be reduced or selectively retained, affecting both colour saturation and perceived depth.
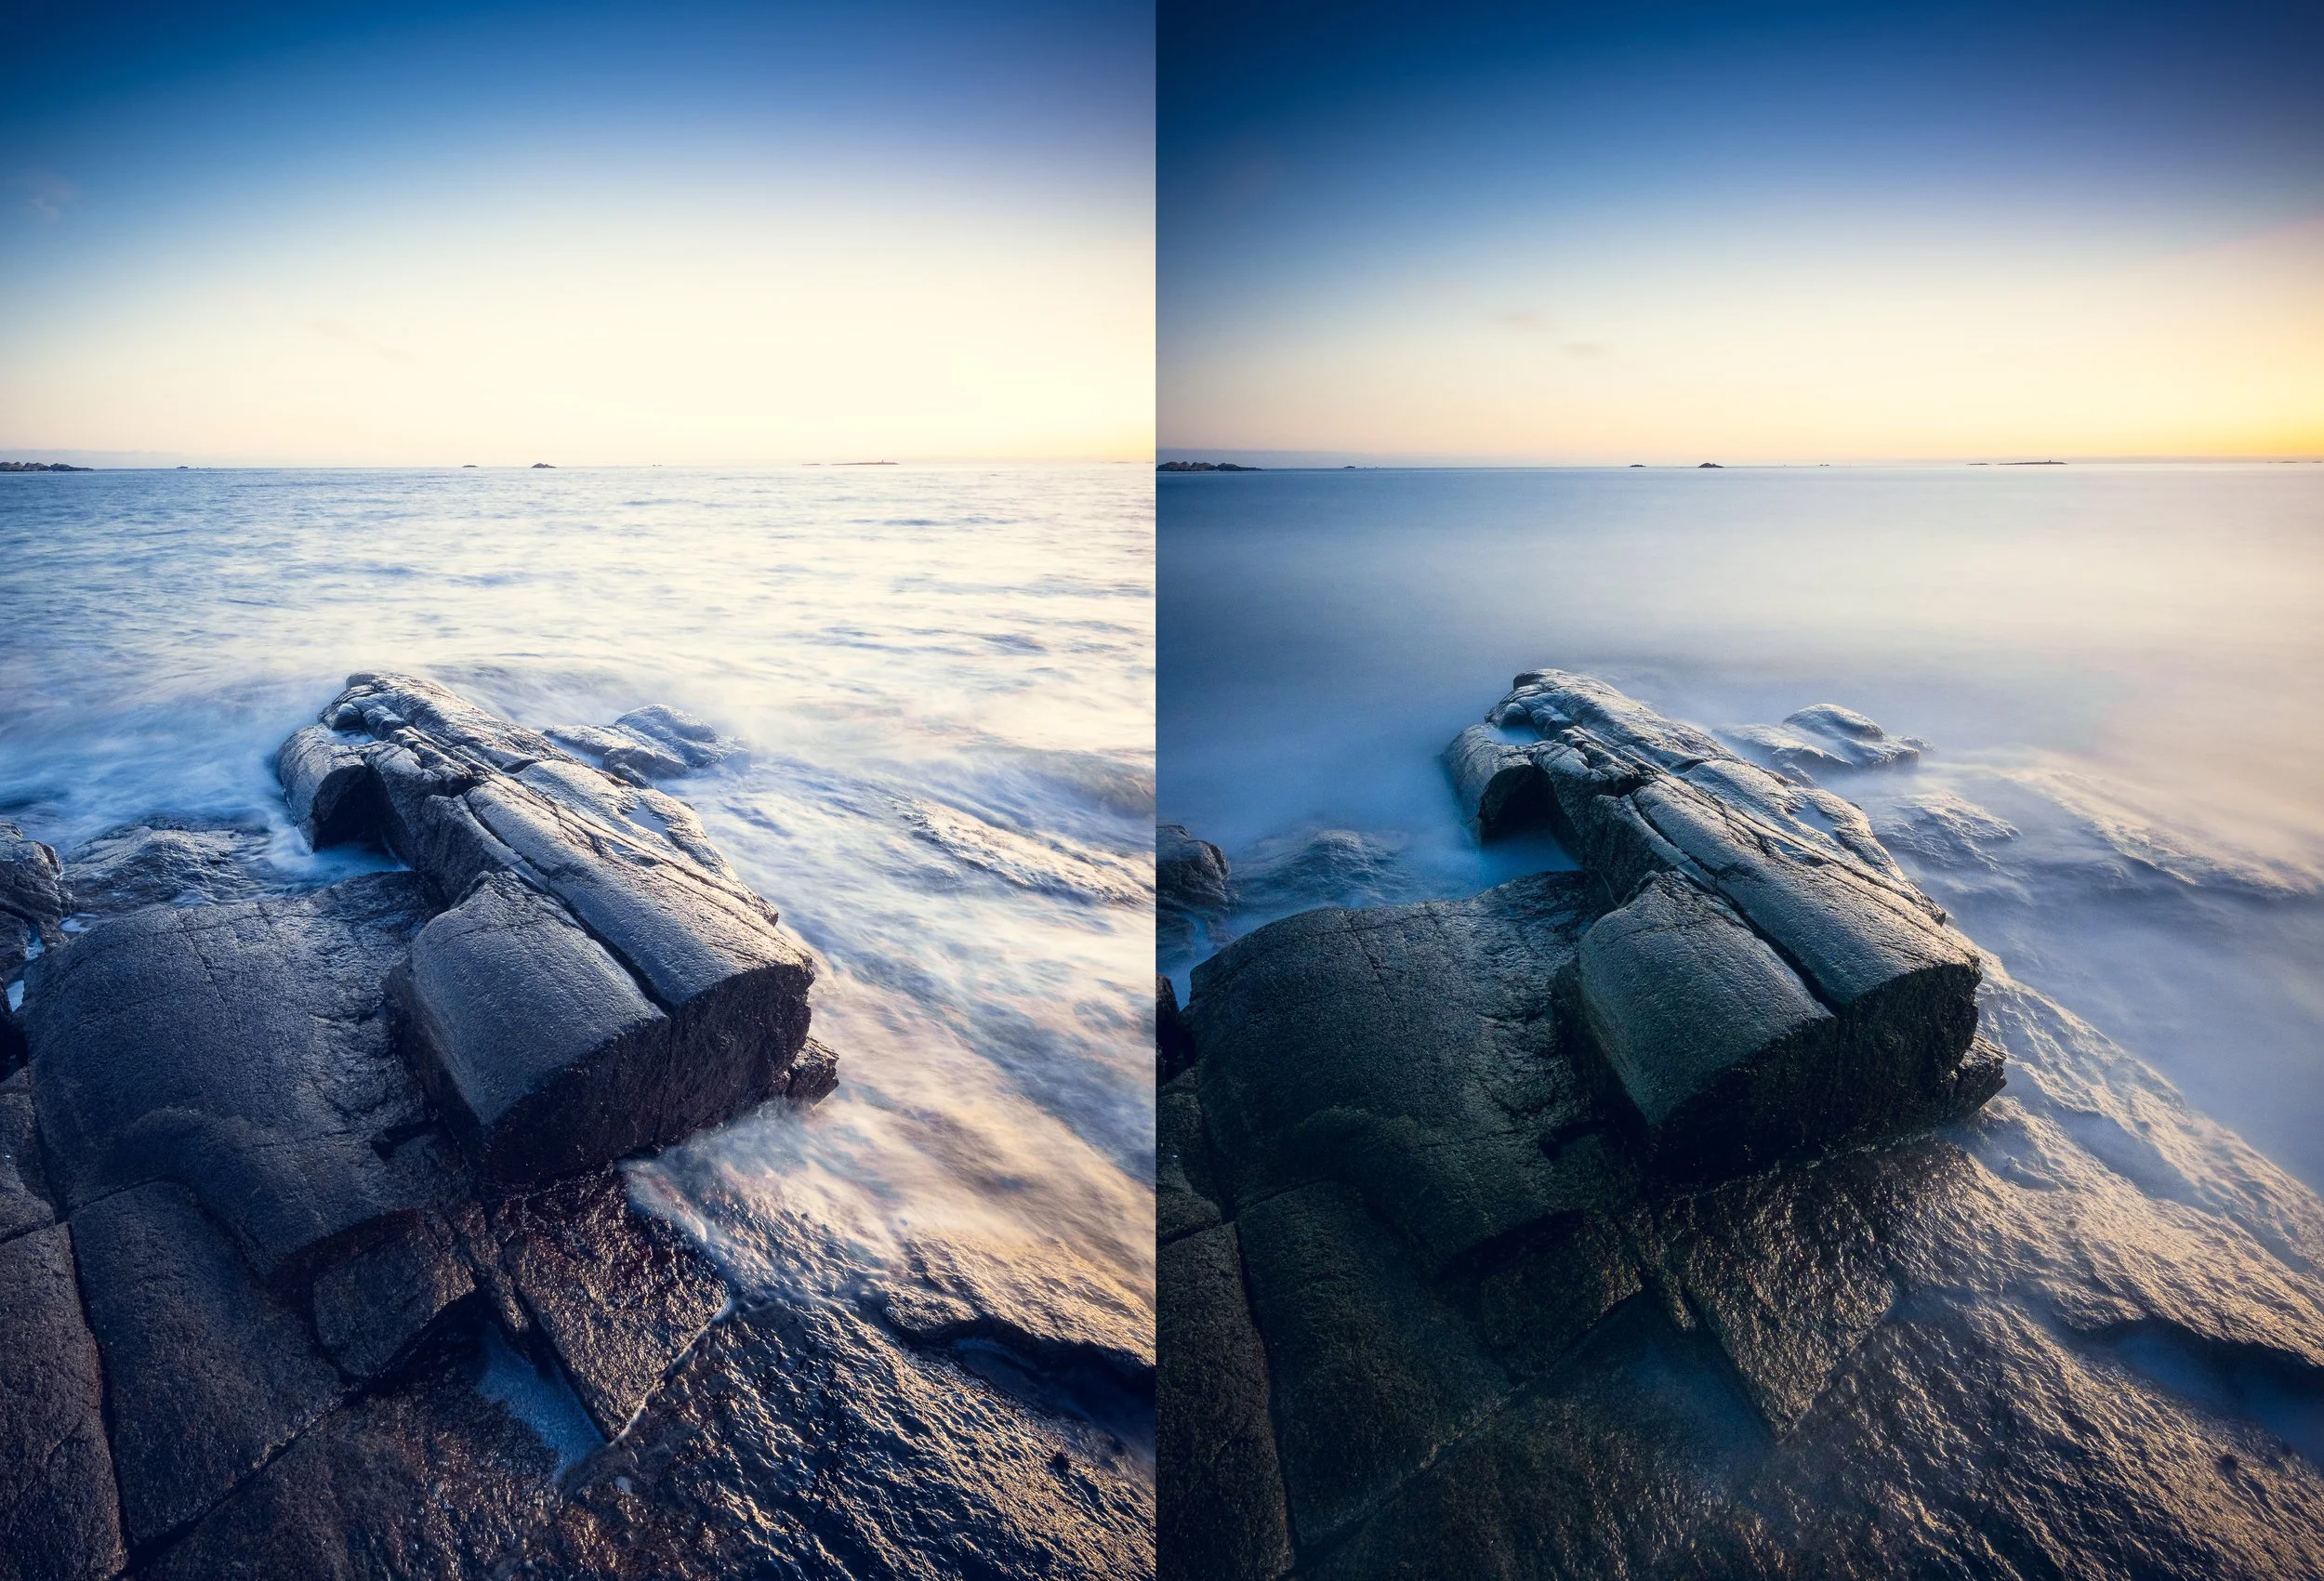
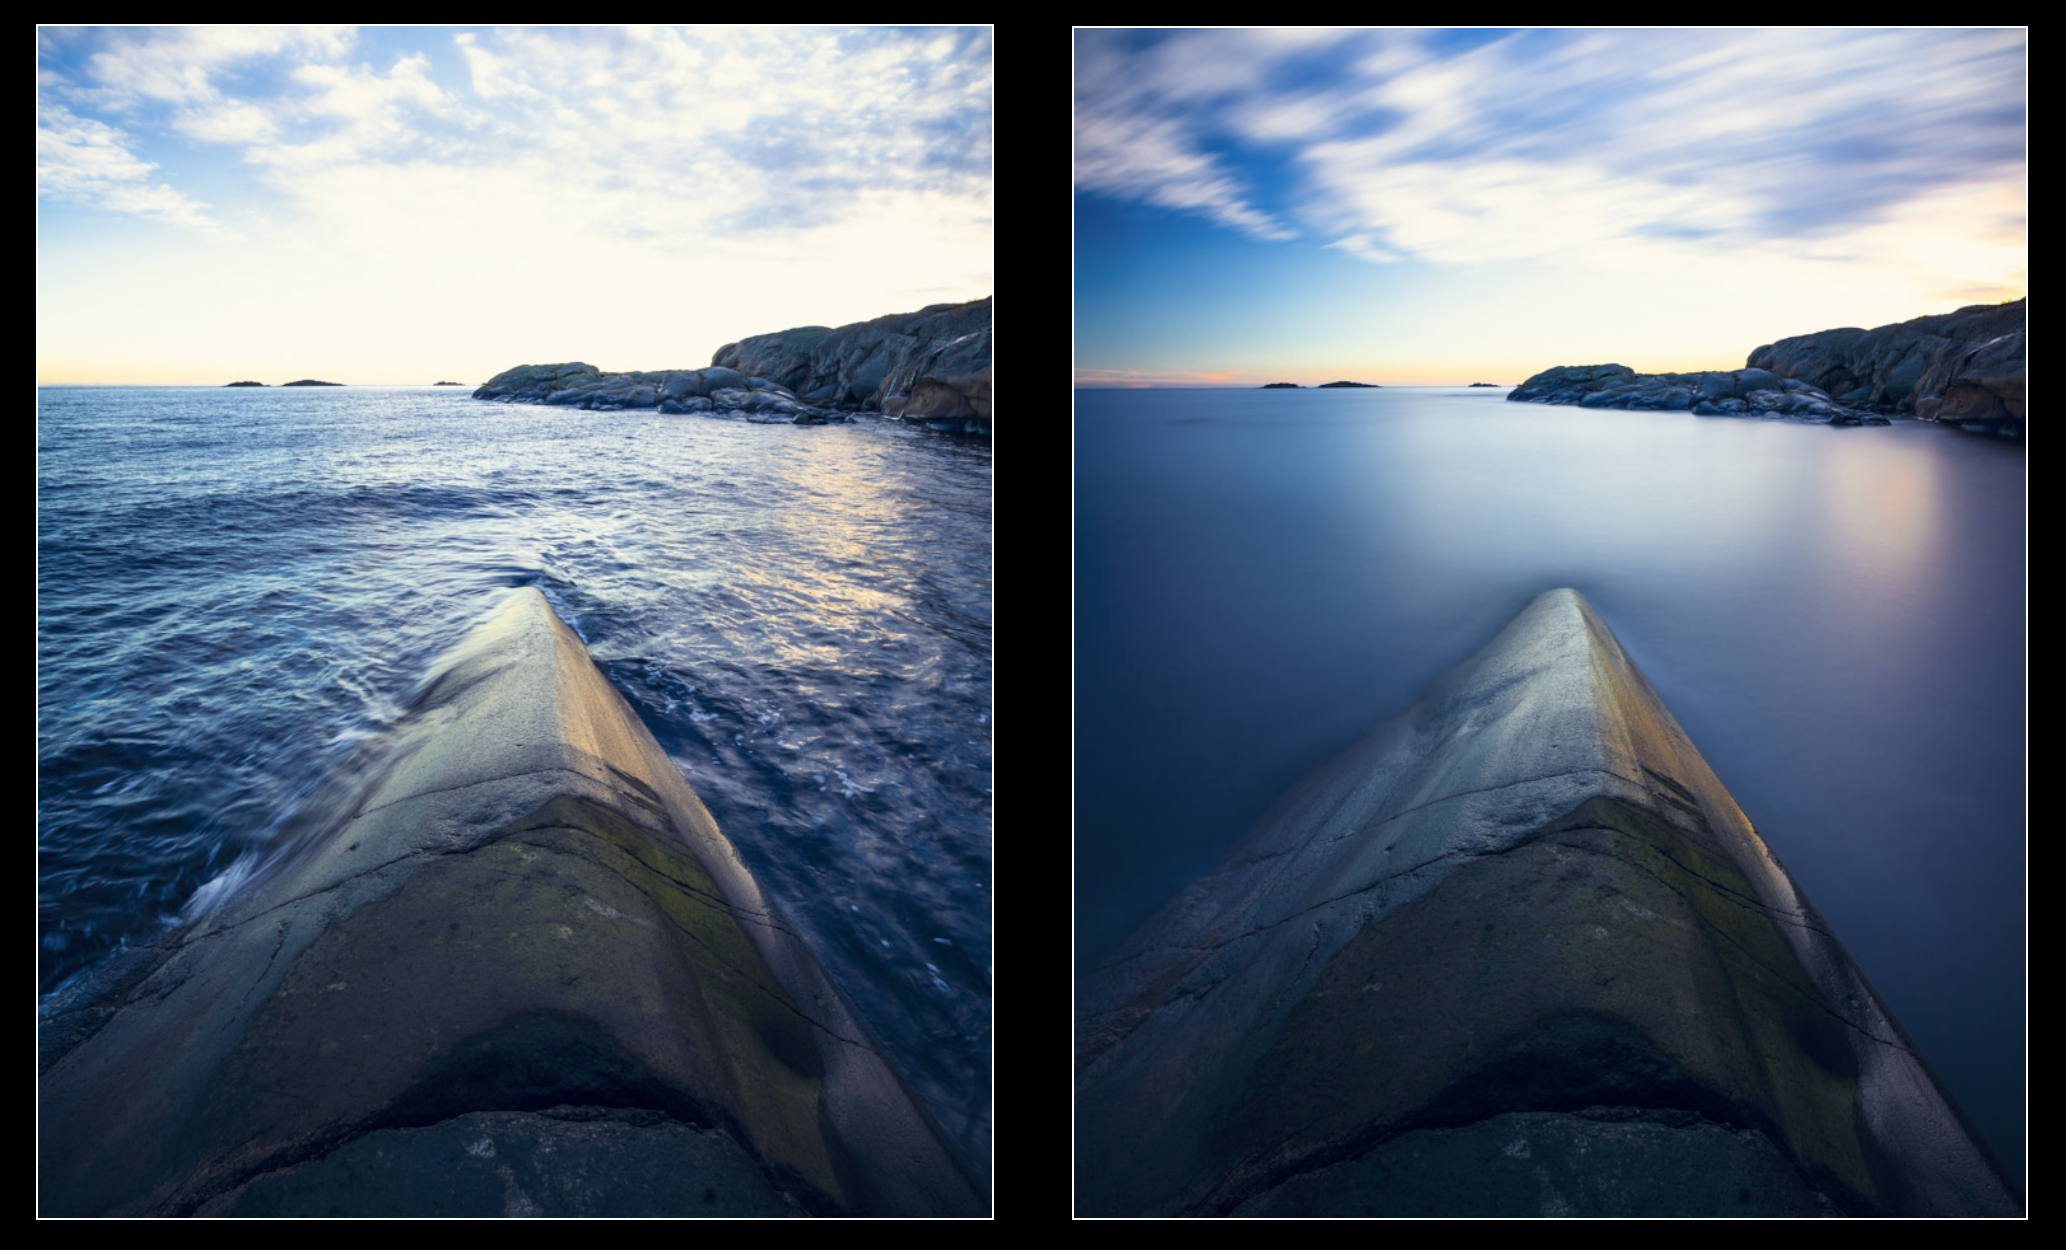
Færder National Park. Norway. On the left: Without filter. Exposure time: 1.3 seconds. On the right: Filter holder system with ND1000, polarising filter and GND8 (0.9) soft. Exposure time: 240 seconds. Photo: Bjørn Joachimsen.
Their real strength lies in subtle control. Rather than removing reflections entirely, they allow the photographer to decide how much of the surface should remain visible.
Neutral Density Filters (ND)
Neutral Density filters reduce the amount of light entering the lens without altering colour. Their main purpose is to extend exposure time or make it possible to use wider apertures in bright conditions.

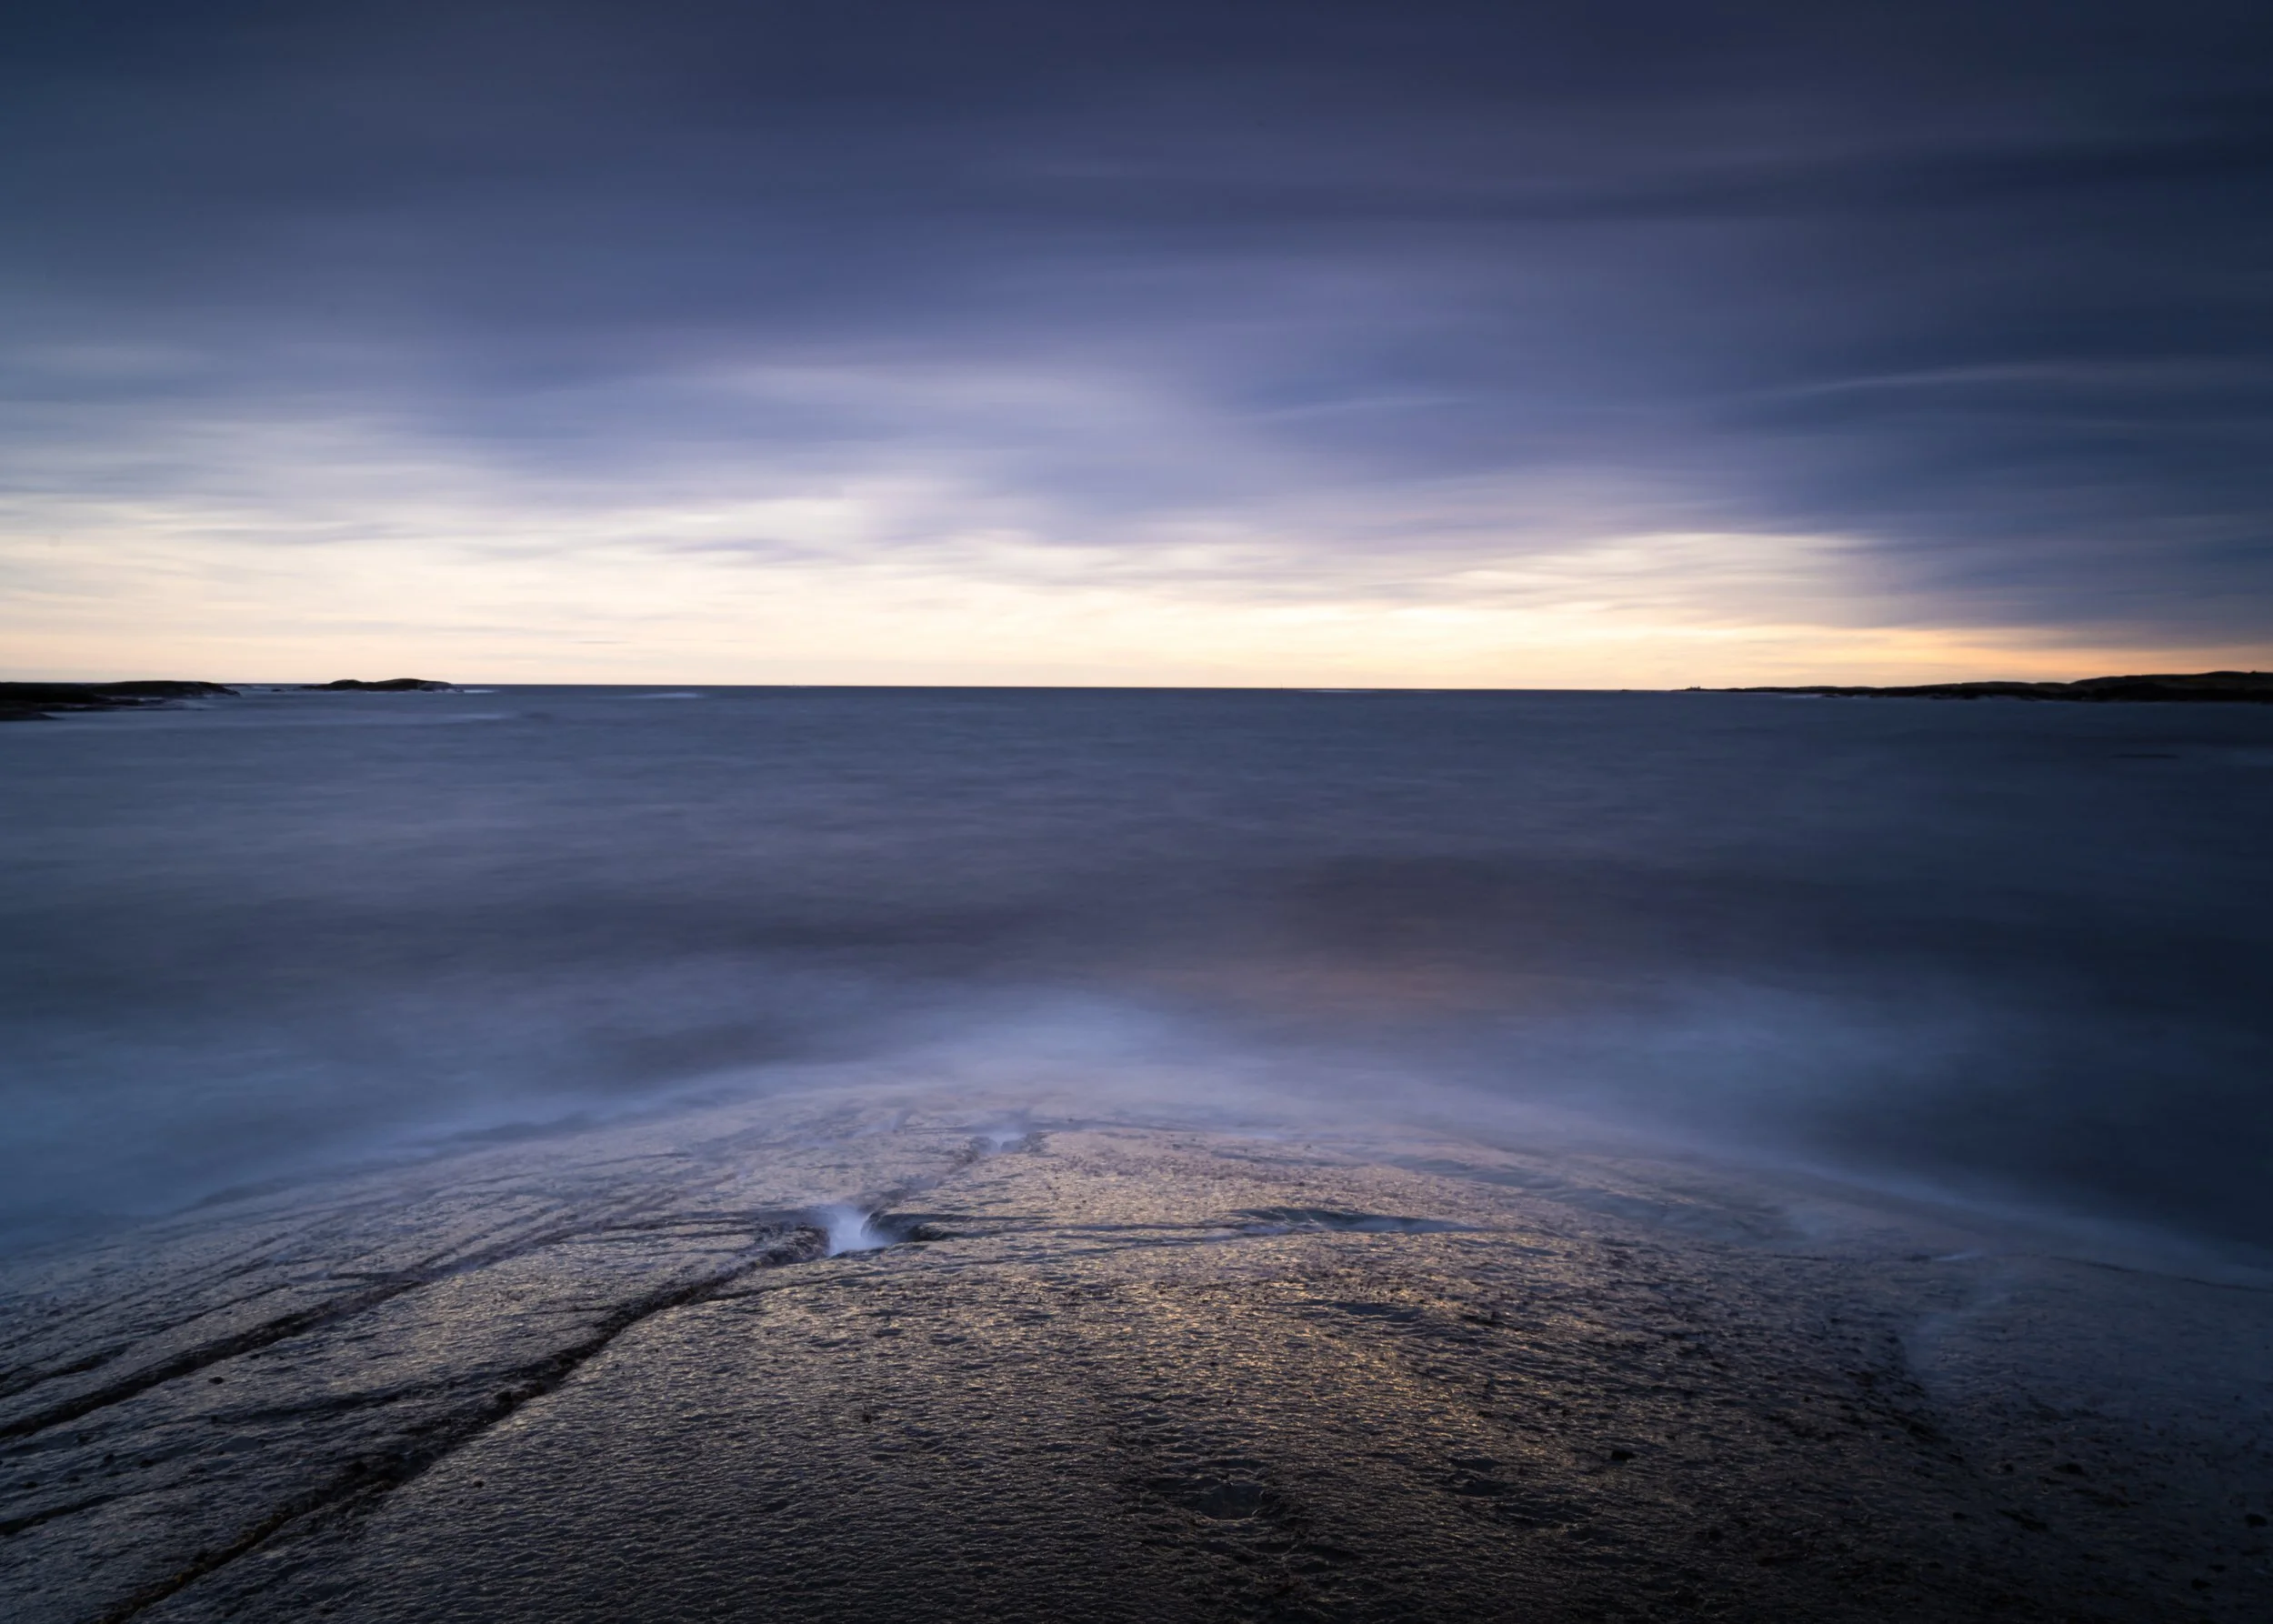
Færder National Park, Norway. Magnetic filter system with ND64 (1.8 ) – 6-stops. Exposure: 240 seconds. Photo: Bjørn Joachimsen.
Graduated ND Filters (GND)
Graduated filters (GND) are used to control brightness selectively within the frame, most often to balance sky and foreground. They transition from dark to clear, allowing for natural tonal compression without visible intervention.
Their use requires precision. The transition must align with the structure of the scene, and when applied correctly, it should not be perceptible.
Lofoten, Norway. Medium GND8 (0.9) – 3 stops, with the darker half positioned at the top of the frame. Photo: Bjørn Joachimsen.
Light Pollution Filters
Designed for night photography, these filters help reduce unwanted colour casts from artificial light sources. They are particularly useful in environments where urban light interferes with natural night tones.
Reine in Lofoten. NiSi System V7, NiSi Natural Night Filter, NiSi Nano Medium GND8 (0.9) – 3 stops. Photo: Bjørn Joachimsen.
Black Mist Filters
Black mist filters introduce controlled diffusion, softening highlights and slightly reducing contrast. While often associated with video, they are equally applicable in still photography where a more atmospheric rendering is desired.
Using ND Filters for Long Exposure Photography– Beyond the Expected
Long exposures fundamentally alter the nature of the photographic moment. Instead of capturing a fraction of time, the image becomes the result of accumulated light over an extended duration. What is recorded is no longer an instant, but a condensation of time itself—compressed into a single frame. This creates a form of expression that cannot be replicated through any other means, where movement is either dissolved or redefined, and the photograph becomes something more than a document of a passing moment.
Hvasser, Norway. On the left: Without filter. Exposure time: 1/4 second. On the right: With ND1000 and graduated ND8 (0.9) – 3 stops. Exposure time: 150 seconds.
Over time, Neutral Density filters have become closely associated with one particular subject: flowing water rendered through long exposure. While this remains a compelling and visually powerful application, it represents only a fraction of what they make possible.
When a scene contains both moving elements—such as water and clouds—and static elements like rocks, piers, or other structures, long exposure introduces a fundamental transformation. The moving components are gradually reduced to more or less uniform surfaces, while the stationary elements remain sharply defined. This contrast has a pronounced visual effect, emphasising texture, form, and detail in the fixed elements of the composition. It is precisely this interplay—between what moves and what remains—that makes longer exposures, often in the range of one minute or more, particularly compelling.
At the same time, much shorter exposure intervals can be equally expressive. In scenes with flowing water—streams, rivers, or waves moving across shoreline rock—exposures in the range of 1/15 second to around one second allow the movement itself to be described rather than dissolved. Instead of abstraction, the image retains rhythm and structure, revealing patterns in the motion that are not visible to the eye in real time. The result is a more dynamic and tactile rendering of water, where movement becomes a defining compositional element rather than something that is removed.
Rakke in Vestfold, Norway. Filter holder system, ND64 (1.8) – 6 stops. Medium GND ND8 (0.9). Exposure time: 60 seconds. Photo: Bjørn Joachimsen.
Using ND Filters in Urban Photography
In cities, filters serve a different purpose. Rather than interpreting natural elements, they are used to manage human presence.
With sufficiently long exposures, movement disappears. People pass through the frame, but do not remain long enough to register. What remains is the structure of the space itself—architecture, geometry, and stillness.
This approach requires careful control. Exposure times typically range from three to five minutes if complete removal of people is desired. A tripod is essential, and the most effective conditions are often found after sunset, when light levels naturally support longer exposures.
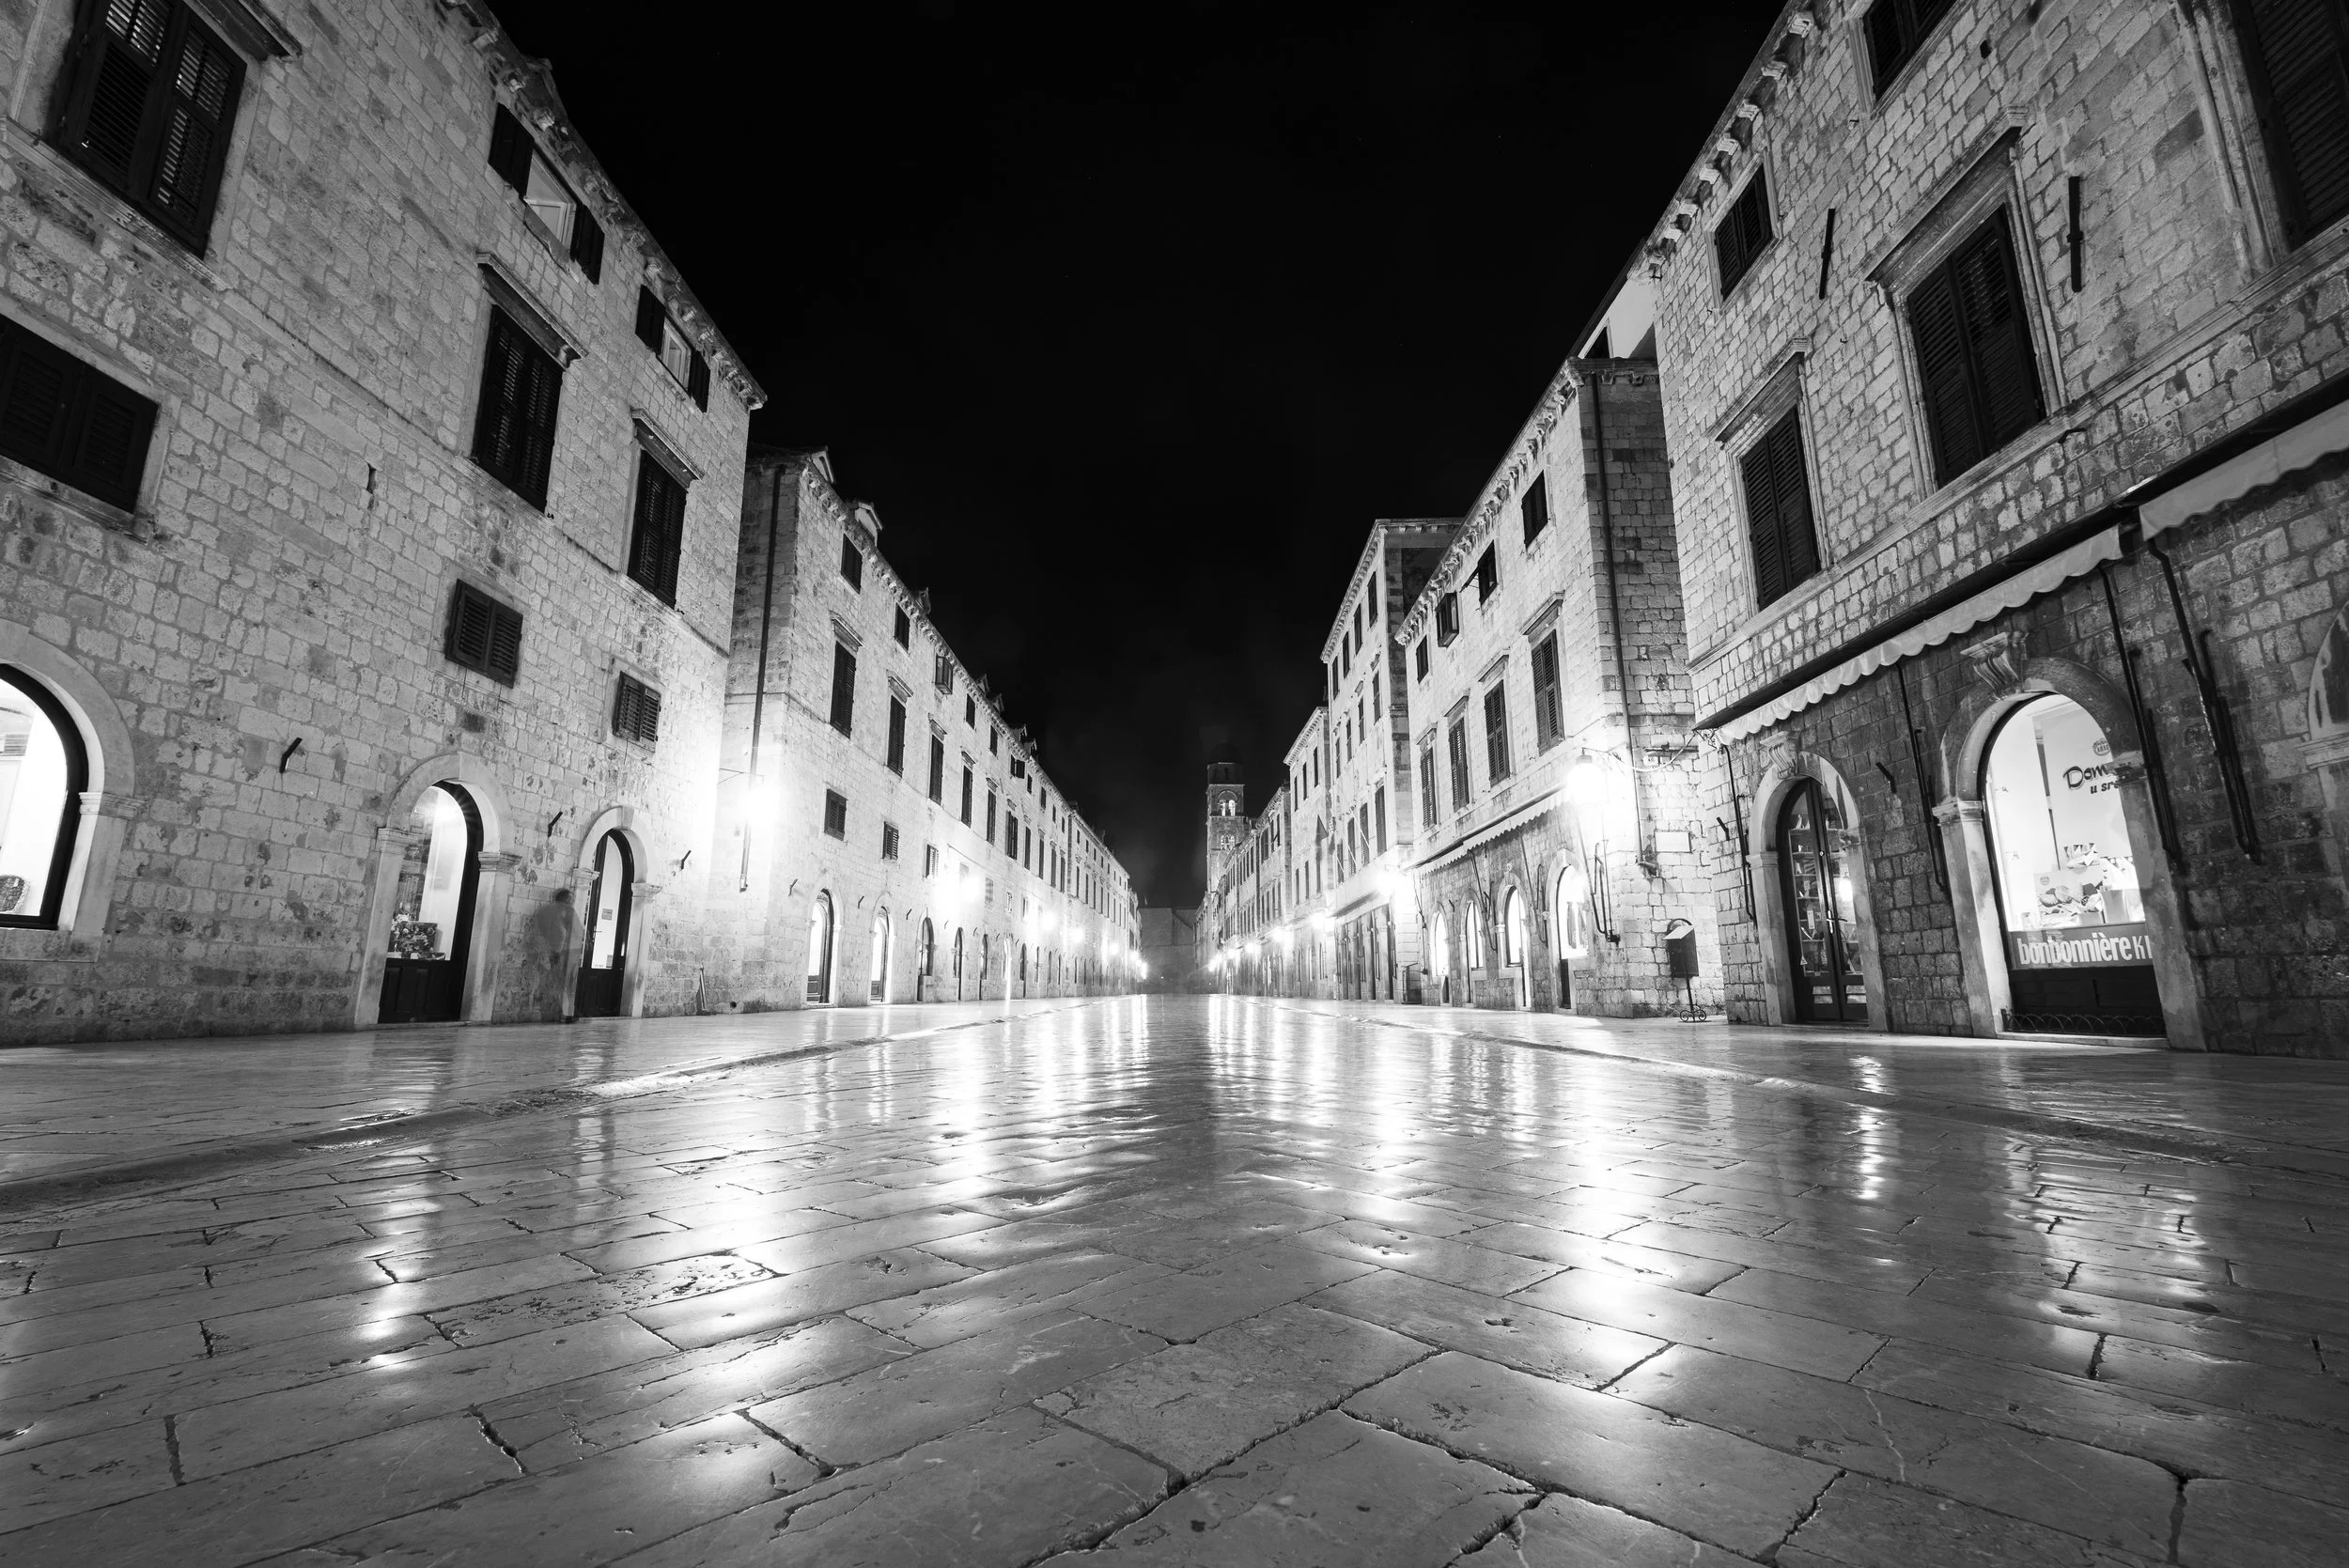
Dubrovnik. Croatia. 150mm filter holder system for Tamron 15–30mm f/2.8. 150×150mm filter: ND64 (1.8) – 6 stops. Exposure: 180 seconds. Photo: Bjørn Joachimsen.
How to Determine Exposure with ND Filters
Working with ND filters introduces a more deliberate process of exposure control.
A consistent method begins by establishing correct exposure without a filter. From this reference point, adjustments are made according to the filter strength. A low ISO and small aperture provide a stable baseline, while automatic ISO should be avoided entirely.
Neutral Density filters reduce the amount of light entering the lens without altering colour. Their primary role is to extend exposure time or enable wider apertures in bright conditions.
Common strengths include:
ND4 (ND 0.6) –2 stops
ND8 (ND 0.9)– 3 stops
ND16 (ND 1.2) – 4 stops
ND64 (ND 1.8) – 6 stops
ND1000 (ND 3.0) –10 stops
ND32000 (ND 4.5) – 16 stops
In practical terms, if correct exposure is 1/30 second without a filter, an ND8 extends this to 1/4 second, while an ND1000 extends it to around 30 seconds.
Modern cameras often meter accurately even with strong filters attached, allowing aperture priority to be used effectively. However, exposures exceeding 30 seconds usually require Bulb mode, where timing can be controlled manually.
Lofoten. Norway. ND8 (3 stops) and GND8 (3 stops). Exposure time: 1 sec. Photo: Bjørn Joachimsen.
Using Graduated ND Filters in Practice
In many landscape situations, the difference in luminance between sky and foreground becomes so pronounced that the image begins to lose both balance and coherence. When this happens, the photograph often feels unresolved, not because of composition, but because the tonal relationship between its elements is no longer convincing.
A graduated ND filter addresses this directly. The filter is divided into two parts—one darkened and one clear—with a gradual transition between them. This allows the photographer to selectively reduce exposure in the brighter areas of the frame, most often the sky, while leaving the rest unaffected. The intention is not to introduce an effect, but to restore a more natural and harmonious balance within the image.
By establishing this balance at the moment of capture, the resulting RAW file contains tonal values that are already closer to the intended final expression. This not only improves image quality, but also simplifies the post-processing workflow, reducing the need for heavy corrections later.
The placement of the filter is critical. The transition must follow the structure of the scene—whether defined by a horizon, a mountain range, or a more irregular landscape. Subtle adjustments in positioning often determine whether the result appears natural or artificial.
Rana, Norway. Using a GND4 (2-stop) with a medium transition, the luminance difference between the sky and its reflection in the lake was balanced, thereby reinforcing the symmetrical composition.
There are also situations where the use of graduated filters extends beyond the conventional. When working with reflections—such as landscapes mirrored in calm water or smooth ice—the reflected image will always appear significantly darker than the subject itself. If the intention is to create a more balanced or even symmetrical expression, a graduated filter can be used to reduce the brightness of the sky, bringing it closer in tonal value to its reflection.
This approach becomes particularly relevant in aurora photography. When the northern lights are reflected in still water, the contrast between sky and reflection can be difficult to manage. By positioning the graduated filter with the darker portion at the top of the frame, the exposure of the sky can be reduced, allowing the reflected light to carry more visual weight within the composition.
In urban or semi-urban night scenes, the opposite problem often occurs. Artificial light sources in the foreground—such as street lighting or illuminated buildings—can become disproportionately bright relative to the sky. In these cases, the filter can be reversed, placing the darker portion at the bottom of the frame. This allows the foreground luminance to be reduced, restoring balance and producing a more controlled result with minimal reliance on post-processing.
The choice of filter strength and transition type plays a significant role. In most situations, the following are among the most versatile options:
GND4 (0.6) – medium transition
GND4 (0.6) – soft transition
GND8 (0.9) – medium transition
GND8 (0.9) – soft transition
In more extreme conditions, where the luminance difference exceeds what a single filter can manage, stronger effects may be required. This can be achieved either by combining two graduated filters—for example two GND4 filters to reach a total of four stops—or by using a stronger filter equivalent to that level of reduction.
Ultimately, the role of the graduated filter is not to draw attention to itself, but to remove imbalance. When used with precision, it becomes invisible—and the image resolves as a coherent whole.
Ullsfjord in Troms, Norway. Filter holder system, ND8 (3 stops), and medium graduated ND 0.9. Exposure time: 0.5 seconds. Photo: Bjørn Joachimsen.
Combining Lens Filters
In practice, the most refined results are often achieved by combining filters rather than relying on only one.
A polarising filter, ND filter, and graduated filter are often used together—each addressing a different aspect of the image. The polariser controls reflections, the ND filter defines time, and the graduated filter stabilises tonal balance.
These are not separate effects, but interdependent adjustments. Their combined use allows the image to be constructed with precision, rather than corrected afterward.

Lofoten, Norway. On the left: Filter holder system with ND64 (6 stops) and polarising filter, and GND8 (3 stops) medium. On the right: Without filters. Photo: Bjørn Joachimsen.
Lens Filters in Aurora and Night Photography
Filters can also play a role in night photography, including aurora and other low-light landscape work.
Reflections in water or ice can create imbalance between sky and foreground. A graduated filter can help restore this balance, while reversing its orientation can control overly bright foreground elements.
Artificial light presents an additional challenge, often introducing unwanted colour shifts. Light pollution filters can reduce these effects, resulting in a more natural rendering of the scene.
In low-light conditions, even minor adjustments can have a significant impact.
Filter Systems: Magnetic or Holder-Based
There are two main ways to work with filters::
Magnetic circular systems prioritise portability, speed, and efficiency. However, in most cases they introduce limitations when working with graduated ND filters, as these require precise positioning within the frame—something that is difficult to achieve without a holder-based system.
Holder-based systems with square or rectangular filters offer a higher degree of flexibility and precision, particularly when working with graduated filters that require careful alignment within the frame. They do, however, take up more space in your bag. In return, they provide a comprehensive and highly adaptable solution, allowing you to combine neutral density filters, a polarising filter, and graduated ND filters within a single, controlled setup.
Lens Filters and Post- Processing
The most considered photographic work often emerges from a deliberate combination of optical control in the field and careful refinement in post-processing. These are not competing approaches, but complementary phases within the same process.
Digital tools offer a high degree of flexibility, allowing for adjustments to contrast, colour, and tonal relationships long after the image has been captured. Yet there are fundamental aspects of the photograph that cannot be reconstructed afterward. The effect of a polarising filter—its ability to selectively remove reflections and reveal underlying structure—is only available at the moment of exposure. More importantly, the visual consequences of long exposure cannot be convincingly replicated through camera features or software. Time, once unrecorded, cannot be recreated.
For this reason, lens filters retain a distinct and irreplaceable role. They define the raw material of the image—the way light, movement, and surface are rendered—while post-processing refines and completes what has already been established. Used together, they form a coherent workflow in which intention is carried consistently from capture to final image.
Why Lens Filters Still Have A Place
Much of what filters do can, to a certain extent, be approximated in post-processing, but the crucial distinction lies in when—and how—the decision is made. The control of reflections in non-metallic surfaces, for instance, is inherently tied to the use of a polarising filter and cannot be fully replicated after the image has been captured. Likewise, the effect of long exposure is fundamentally rooted in the continuous accumulation of light over time; while techniques such as interval compositing or post-processing can imitate aspects of this, they do not fully reproduce its visual or tonal coherence.
Ultimately, filters are not about adding something new. They are about recognising what is already present—and deciding how it should be rendered at the moment of exposure.
Explore These Techniques on Location
Several of our workshops offer excellent opportunities to work with lens filters in the field. InLofoten and Vesterålen, ND and polarizing filters are especially useful for seascapes, changing light, reflections, and long exposures. In Paris and Venice, they can help simplify busy urban scenes and create more atmospheric cityscapes through long exposure and careful control of reflections. On our Musk Ox and Autumn Landscape Workshop, filters are also highly relevant for working with autumn light, landscape contrast, and moving water.
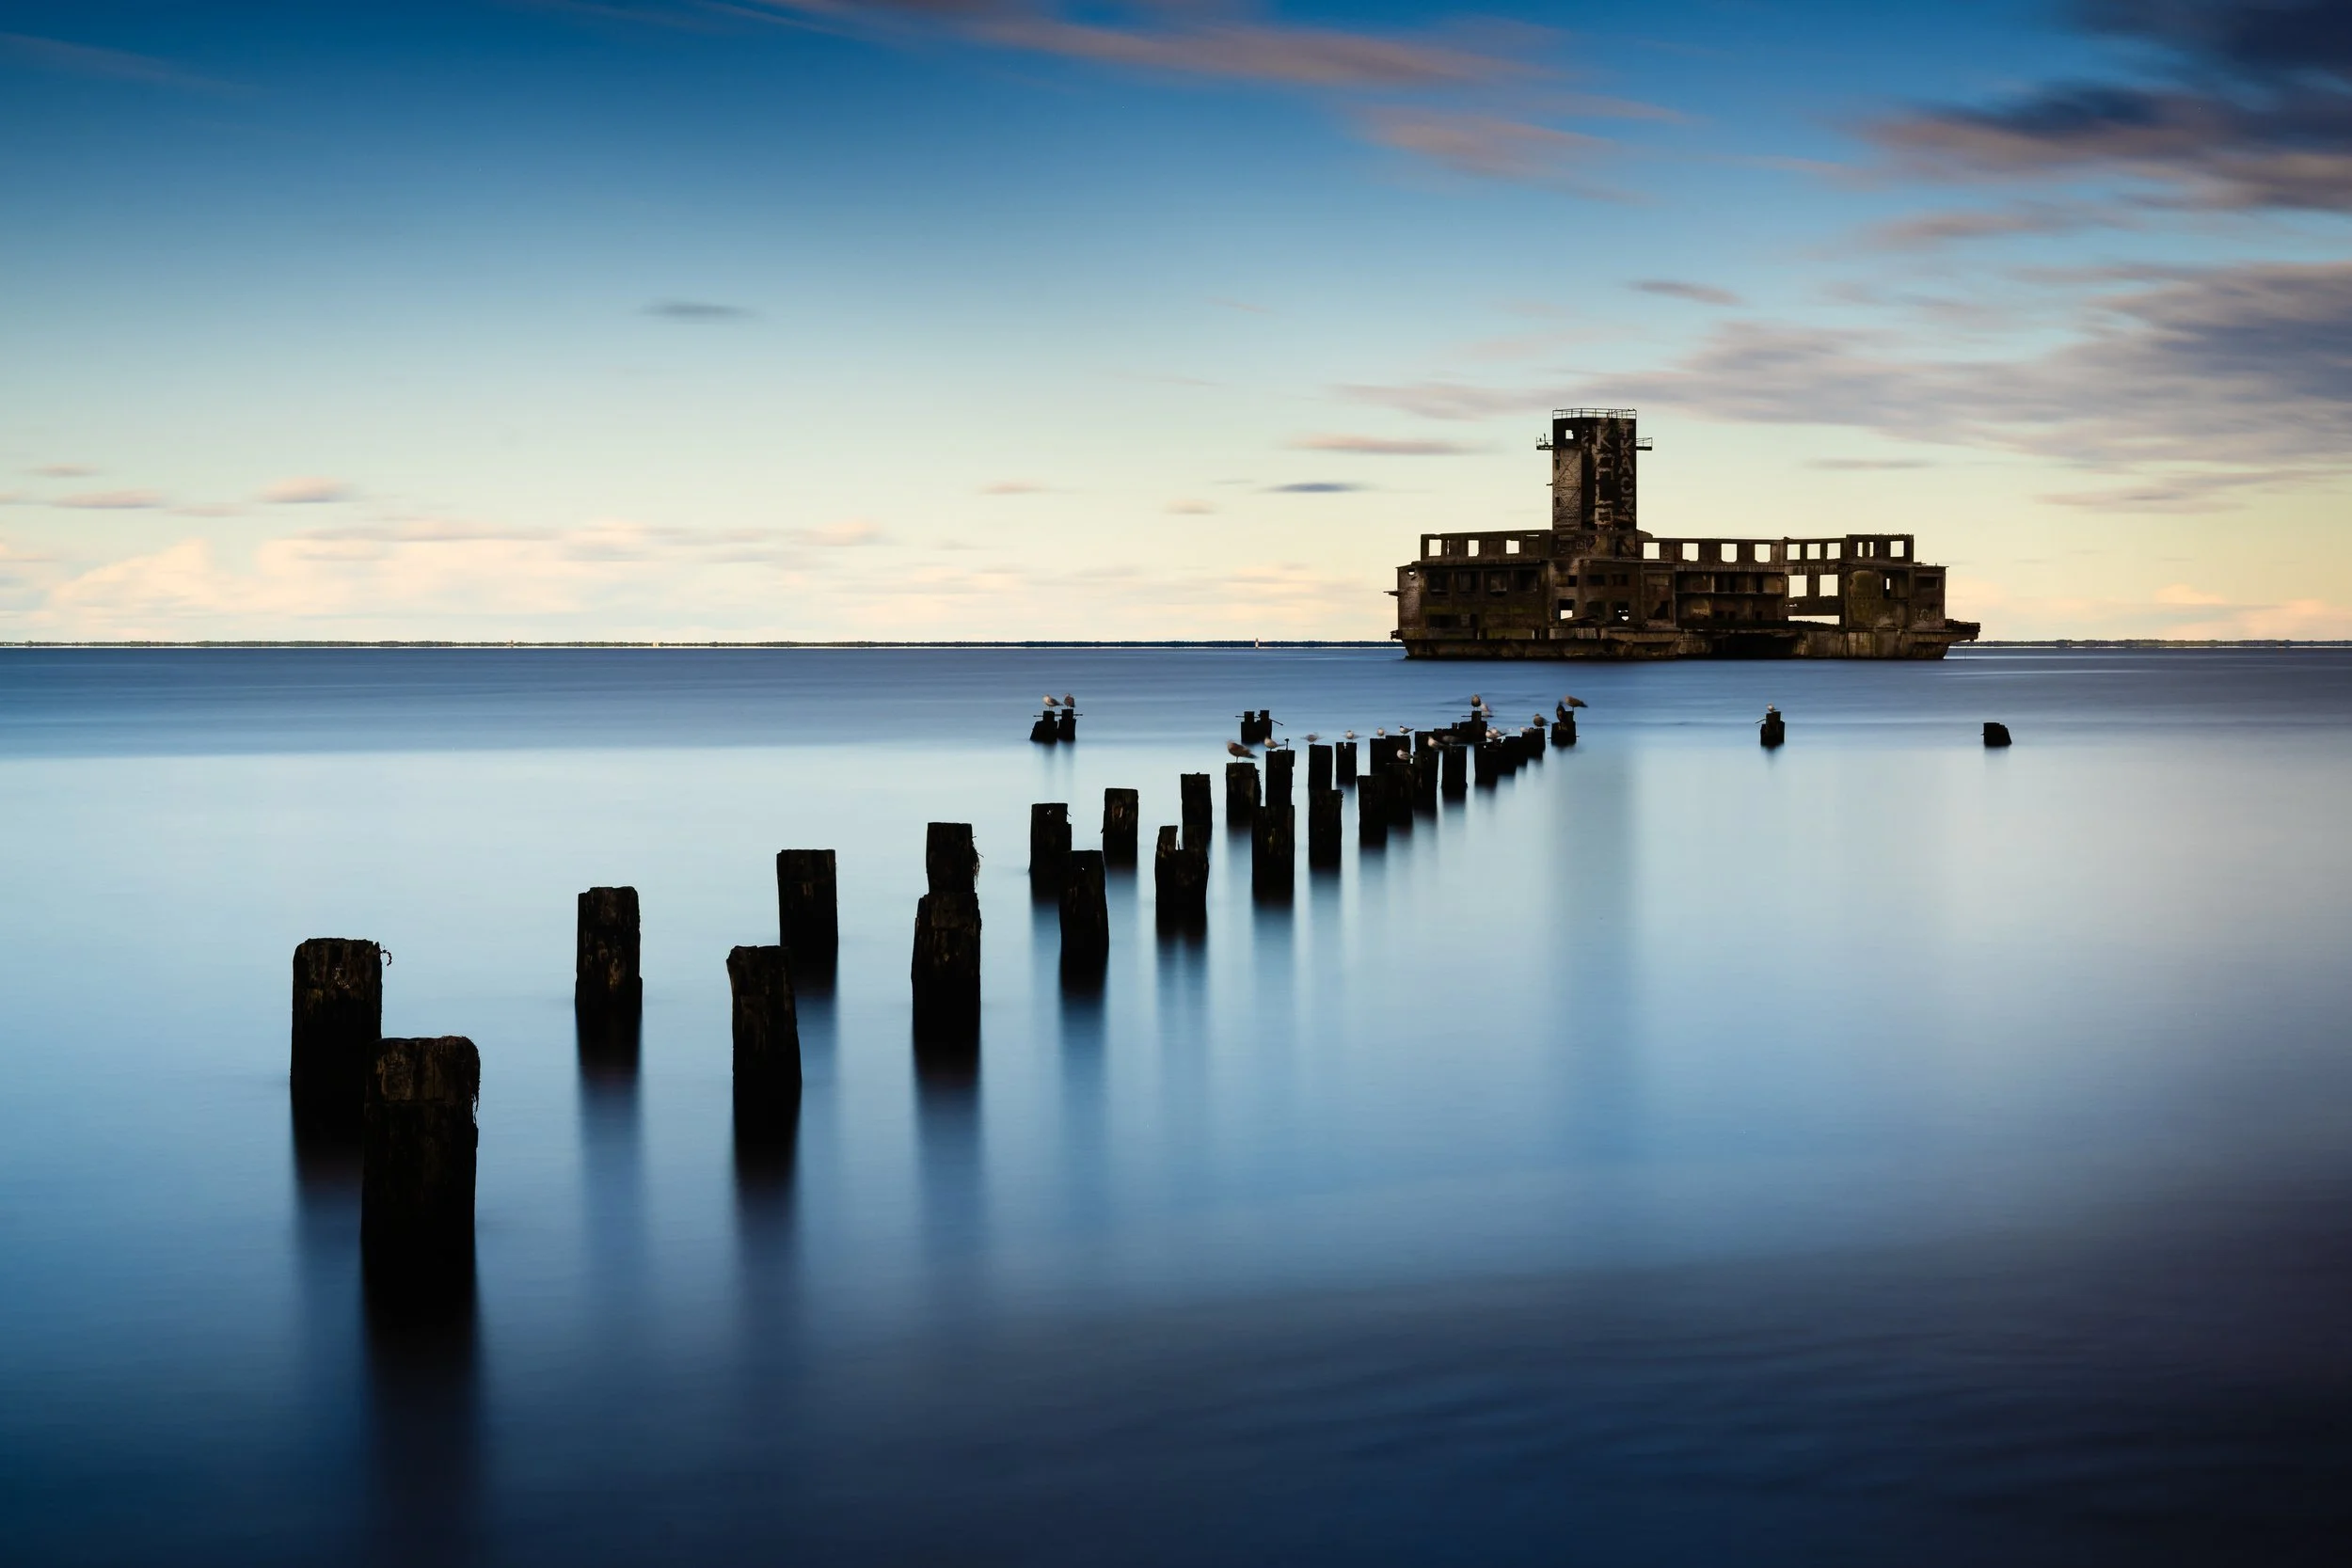
Gdynia. Poland. Filter holder system with ND64 (6 stops) and GND 8 (3 stops). Exposure time: 120 seconds. Photo: Bjørn Joachimsen.